In this section we will serve our model in our RHOAI instance using Gitops. We will also use a Custom serving runtime (Triton) in order to deploy the model.
To do this we would need a data connection to the S3 instance where our model is stored, and we would need to create the Custom serving runtime and an Inference server
Custom Serving runtime
RHOAI supports the ability to add your own serving runtime. But it does not support the runtimes themselves. Therefore, it is up to you to configure, adjust and maintain your custom runtimes.
In this tutorial we will setup the Triton Runtime (NVIDIA Triton Inference Server) and serve a model using it.
-
In the
parasol-insurancetenant, create a directory namedmulti-model-serving -
Create the
baseandoverlaysdirectories inside themulti-model-servingdirectory -
Create a directory named
parasol-insurance-devunder themulti-model-serving/overlaysdirectory -
Create a
kustomization.yamlinside themulti-model-serving/overlays/parasol-insurance-devdirectory and point it to the base folder of themulti-model-servingdirectory.Solution
multi-model-serving/overlays/parasol-insurance-dev/kustomization.yamlapiVersion: kustomize.config.k8s.io/v1beta1 kind: Kustomization resources: - ../../base -
Create a
kustomization.yamlinside themulti-model-serving/basedirectory. This should have theparasol-insurancenamespace, as well as data-connection, inference-service, and serving-runtime as resources.multi-model-serving/base/kustomization.yamlapiVersion: kustomize.config.k8s.io/v1beta1 kind: Kustomization resources: <add resources here>Solution
multi-model-serving/base/kustomization.yamlapiVersion: kustomize.config.k8s.io/v1beta1 kind: Kustomization namespace: parasol-insurance resources: - data-connection.yaml - inference-service.yaml - serving-runtime.yaml -
Create a data connection with the minio details. Create a file named 'data-connection.yaml' inside the
multi-model-serving/basedirectory with the minio details. Make sure to add the RHOAI labels so it will show in the RHOAI Dashboard.Solution
multi-model-serving/base/data-connection.yamlkind: Secret apiVersion: v1 metadata: name: accident-model-data-conn labels: opendatahub.io/dashboard: 'true' opendatahub.io/managed: 'true' annotations: opendatahub.io/connection-type: s3 openshift.io/display-name: multi-model # argocd.argoproj.io/sync-wave: "-100" stringData: AWS_ACCESS_KEY_ID: minio AWS_S3_BUCKET: models AWS_S3_ENDPOINT: http://minio.object-datastore.svc.cluster.local:9000 AWS_SECRET_ACCESS_KEY: minio123 AWS_DEFAULT_REGION: east-1 type: Opaque -
To create the custom serving Triton runtime, create a file named 'serving-runtime.yaml' inside the
multi-model-serving/basedirectory with the following content:multi-model-serving/base/serving-runtime.yamlapiVersion: serving.kserve.io/v1alpha1 kind: ServingRuntime metadata: name: multi-model-server labels: opendatahub.io/dashboard: 'true' annotations: maxLoadingConcurrency: "2" openshift.io/template-display-name: "Triton Model Server" openshift.io/display-name: multi-model-server opendatahub.io/apiProtocol: REST enable-route: 'true' opendatahub.io/template-name: triton spec: supportedModelFormats: - name: keras version: "2" # 2.6.0 autoSelect: true - name: onnx version: "1" # 1.5.3 autoSelect: true - name: pytorch version: "1" # 1.8.0a0+17f8c32 autoSelect: true - name: tensorflow version: "1" # 1.15.4 autoSelect: true - name: tensorflow version: "2" # 2.3.1 autoSelect: true - name: tensorrt version: "7" # 7.2.1 autoSelect: true protocolVersions: - grpc-v2 multiModel: true grpcEndpoint: "port:8085" grpcDataEndpoint: "port:8001" volumes: - name: shm emptyDir: medium: Memory sizeLimit: 2Gi containers: - name: triton image: nvcr.io/nvidia/tritonserver:23.05-py3 command: [/bin/sh] args: - -c - 'mkdir -p /models/_triton_models; chmod 777 /models/_triton_models; exec tritonserver "--model-repository=/models/_triton_models" "--model-control-mode=explicit" "--strict-model-config=false" "--strict-readiness=false" "--allow-http=true" "--allow-sagemaker=false" ' volumeMounts: - name: shm mountPath: /dev/shm resources: requests: cpu: 500m memory: 1Gi limits: cpu: "5" memory: 1Gi livenessProbe: exec: command: - curl - --fail - --silent - --show-error - --max-time - "9" - http://localhost:8000/v2/health/live initialDelaySeconds: 5 periodSeconds: 30 timeoutSeconds: 10 builtInAdapter: serverType: triton runtimeManagementPort: 8001 memBufferBytes: 134217728 modelLoadingTimeoutMillis: 90000
Inference Service
Once we have our serving runtime, we can use it as the runtime for our Inference Service.
-
To create the Inference Service, create a file named 'inference-service.yaml' inside the
multi-model-serving/basedirectory. Make sure to add the RHOAI labels so we can view it in the RHOAI dashboard.multi-model-serving/base/inference-service.yamlapiVersion: serving.kserve.io/v1beta1 kind: InferenceService metadata: annotations: openshift.io/display-name: accident-detect-model serving.kserve.io/deploymentMode: ModelMesh name: accident-detect-model labels: <add RHOAI dashboard labels here> spec: predictor: model: modelFormat: name: <add format name here> version: '1' name: '' resources: {} runtime: <add runtime> storage: key: <add data connection here> path: <Add model path here>Solution
multi-model-serving/base/inference-service.yamlapiVersion: serving.kserve.io/v1beta1 kind: InferenceService metadata: annotations: openshift.io/display-name: accident-detect-model serving.kserve.io/deploymentMode: ModelMesh name: accident-detect-model labels: opendatahub.io/dashboard: 'true' spec: predictor: model: modelFormat: name: onnx version: '1' name: '' resources: {} runtime: multi-model-server storage: key: accident-model-data-conn path: accident_model/accident_detect.onnx -
Push the changes to your ai-accelerator fork.
-
Wait for the application to sync in Argo.
-
Navigate to RHOAI, and validate that there is a new model serving under the
Modelstab, and check that its status looks green.
Test the served model
To test if the served model is working as expected, go back to RHOAI parasol-insurance project and go to the workbenches tab.
Stop the standard-workbench and start the custom-workbench.
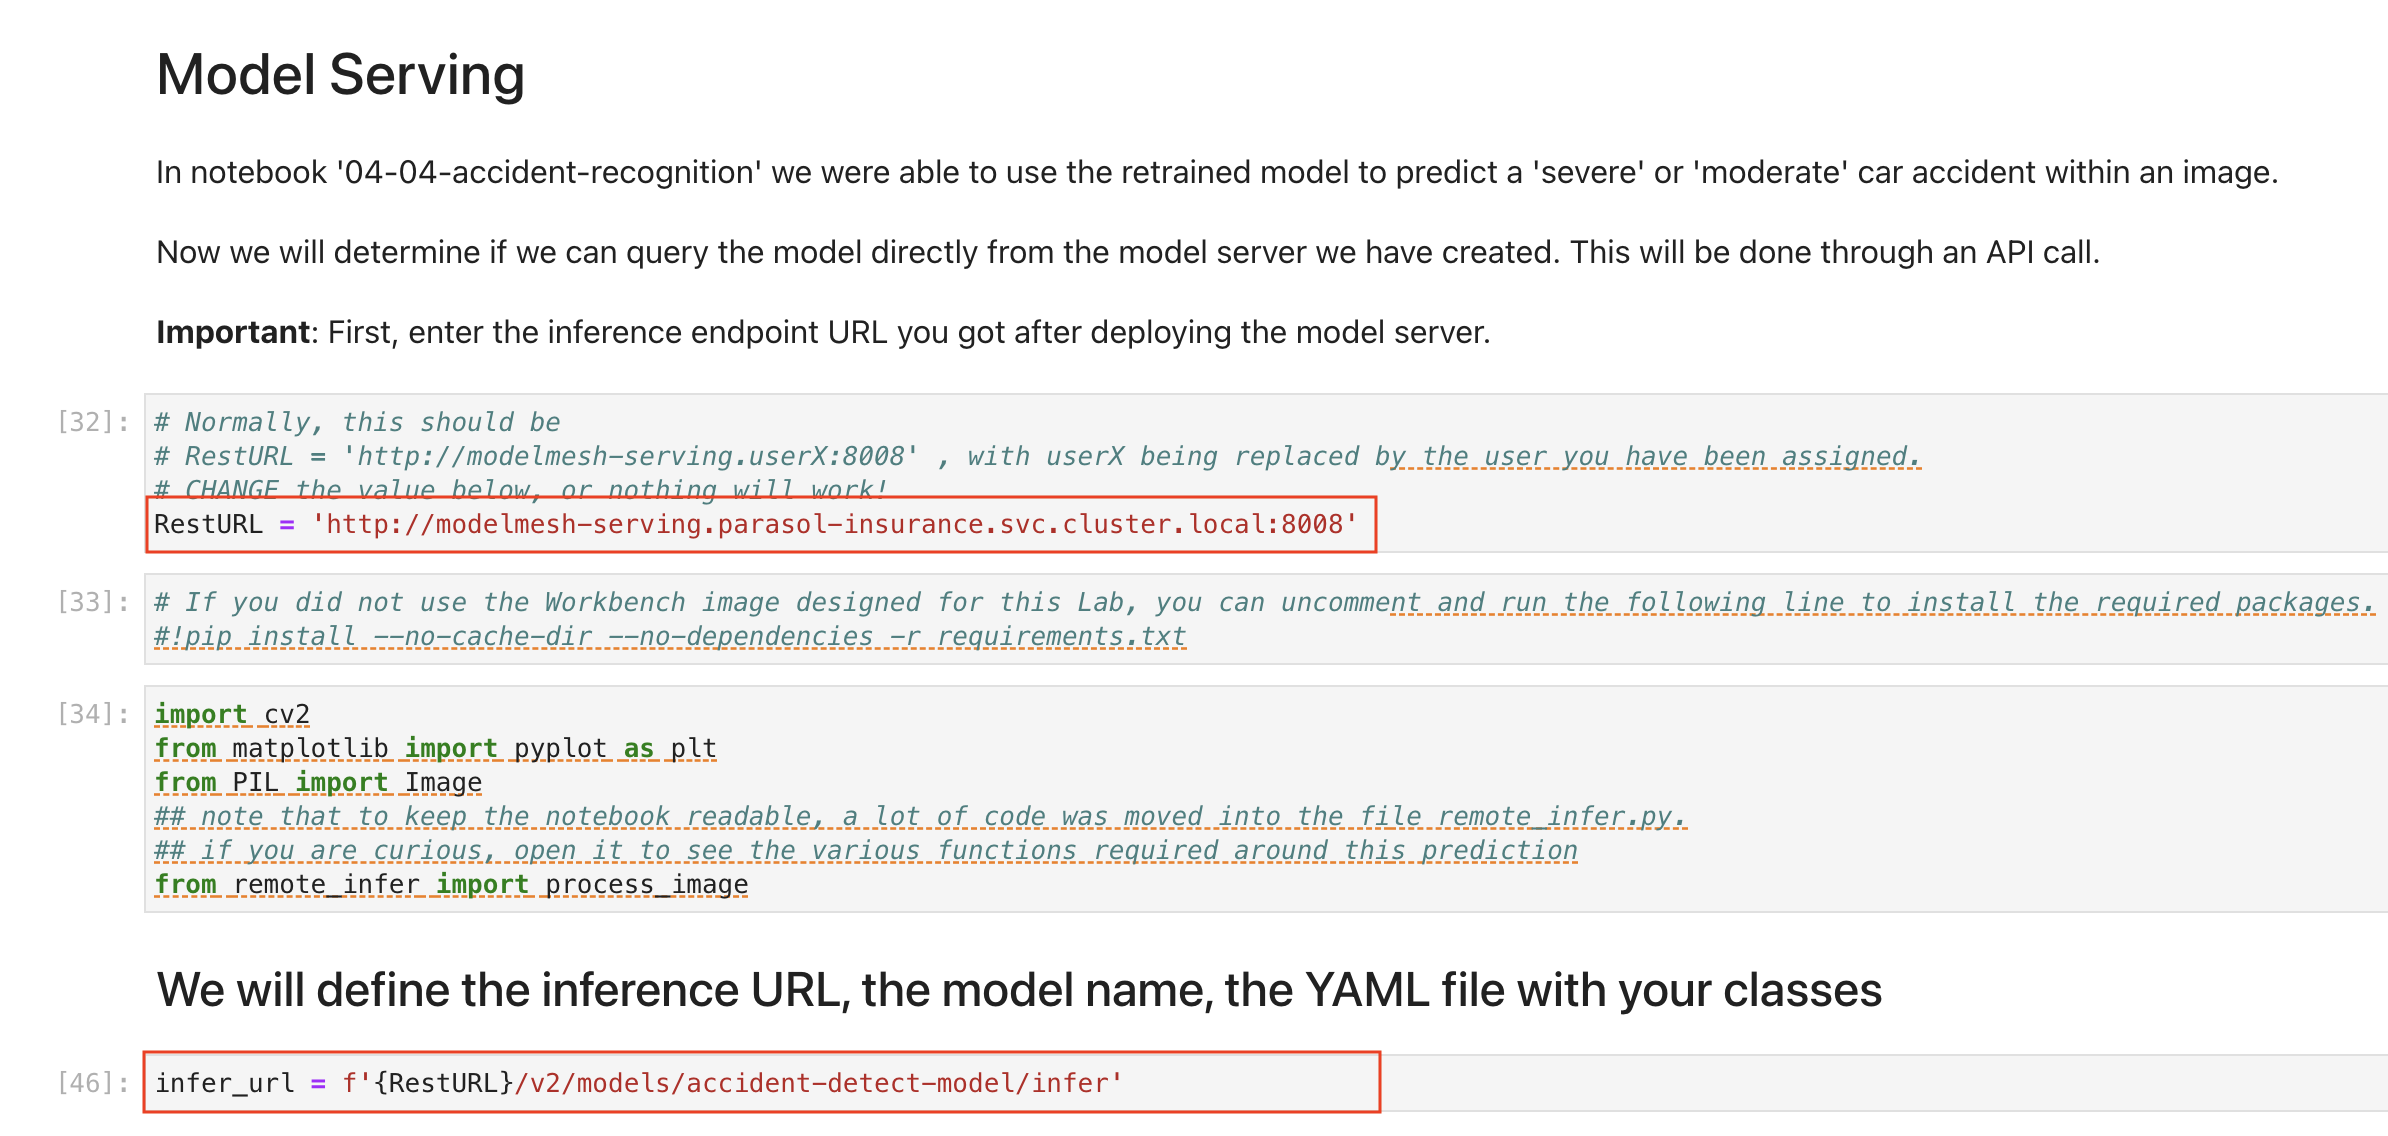
Once the custom-workbench is running, navigate to parasol-insurance/lab-materials/04. Open the 04-05-model-serving notebook. We need to change the RestURL/infer_url value. We can get it from the model that we just deployed.
Make sure to change the values in the notebook when testing:

After making these changes, run the notebook and we should see an output to the image that we pass to the model.
|
You have now entered the CHALLENGE PHASE of your project! You are now enabled! Your team lead has died! You must Deploy the model to prod ideally using gitops.
|