Model Quantization Pipeline
Learning Objectives
By completing this exercise, you will:
-
Understand how to automate model quantization using Kubeflow Pipelines
-
Learn to create, compile, and deploy ML pipelines in OpenShift AI
-
Gain experience with pipeline components and data flow management
-
Learn pipeline parameter configuration and execution monitoring
-
Compare automated pipeline versus manual quantization workflows
Overview
This pipeline automates the model quantization process you completed manually in the previous lab. The pipeline handles model downloading from either S3 (MinIO) storage or HuggingFace Hub, quantization, S3 upload of results, and accuracy evaluation automatically through a series of connected components.
Pipeline Overview
The pipeline consists of the following stages:
-
Create PVC: Creates a Persistent Volume Claim for storing model data
-
Download Model: Downloads the specified model from either S3 (MinIO) storage or HuggingFace Hub (controlled by
use_s3_downloadparameter) -
Quantize Model: Performs model quantization (supports int4 and int8 quantization)
-
Upload Model: Uploads the quantized model to a S3 (MinIO) storage location
-
Evaluate Model: Evaluates the quantized model’s accuracy
-
Delete PVC: Cleans up by deleting the PVC after completion
Prerequisites
Before starting this exercise, ensure you have:
-
Completed the previous quantization lab (module-optimization-lab-1)
-
OpenShift AI environment with configured pipeline server
-
S3-compatible storage data connection set up in OpenShift AI (for S3 download path)
-
Either:
-
Models pre-uploaded to S3 (MinIO) storage in the expected format and path structure, OR
-
External internet access to HuggingFace Hub (for HuggingFace download path)
-
-
Access to a workbench with GPU capabilities
Storage Requirements
The pipeline creates a PVC with:
-
Size: 30Gi
-
Access Mode: ReadWriteMany
-
Storage Class: standard
Make sure your cluster has the appropriate storage class available.
Data Source Configuration
Before running the pipeline, configure the data source based on your chosen download method:
S3 Download Configuration (use_s3_download=true)
If using S3 download, configure the S3 storage connection:
-
Create a data connection in OpenShift AI pointing to your MinIO S3 storage. You can reuse the minio-models connection created in the previous lab.
-
The data connection requires these mandatory fields:
-
Connection name:
minio-models(hardcoded in the pipeline source file) -
Access Key: Your MinIO access key
-
Secret Key: Your MinIO secret key
-
Endpoint: Your MinIO endpoint URL
-
Bucket: Ensure the target bucket exists in MinIO before running the pipeline
-
Models must be pre-uploaded to your S3 bucket in the correct directory structure. For example, the default model path ibm-granite/granite-3.3-2b-instruct should contain all model files (*.safetensors, config.json, tokenizer files, etc.) in the S3 bucket.
|
HuggingFace Download Configuration (use_s3_download=false)
If using HuggingFace download, ensure:
-
Internet Access: Your OpenShift AI environment has external internet access to reach
huggingface.co -
Model ID: Use the HuggingFace model identifier (e.g.,
ibm-granite/granite-3.3-2b-instruct) in themodel_idparameter -
No Authentication Required: For public models, no additional configuration is needed
|
Choosing your download method:
|
Workbench Setup
You will reuse the workbench created in the previous model quantization lab for pipeline development.
| If you stopped the workbench after the previous lab, you need to start it again to modify and compile the pipeline. |
-
Open a terminal session in the workbench:
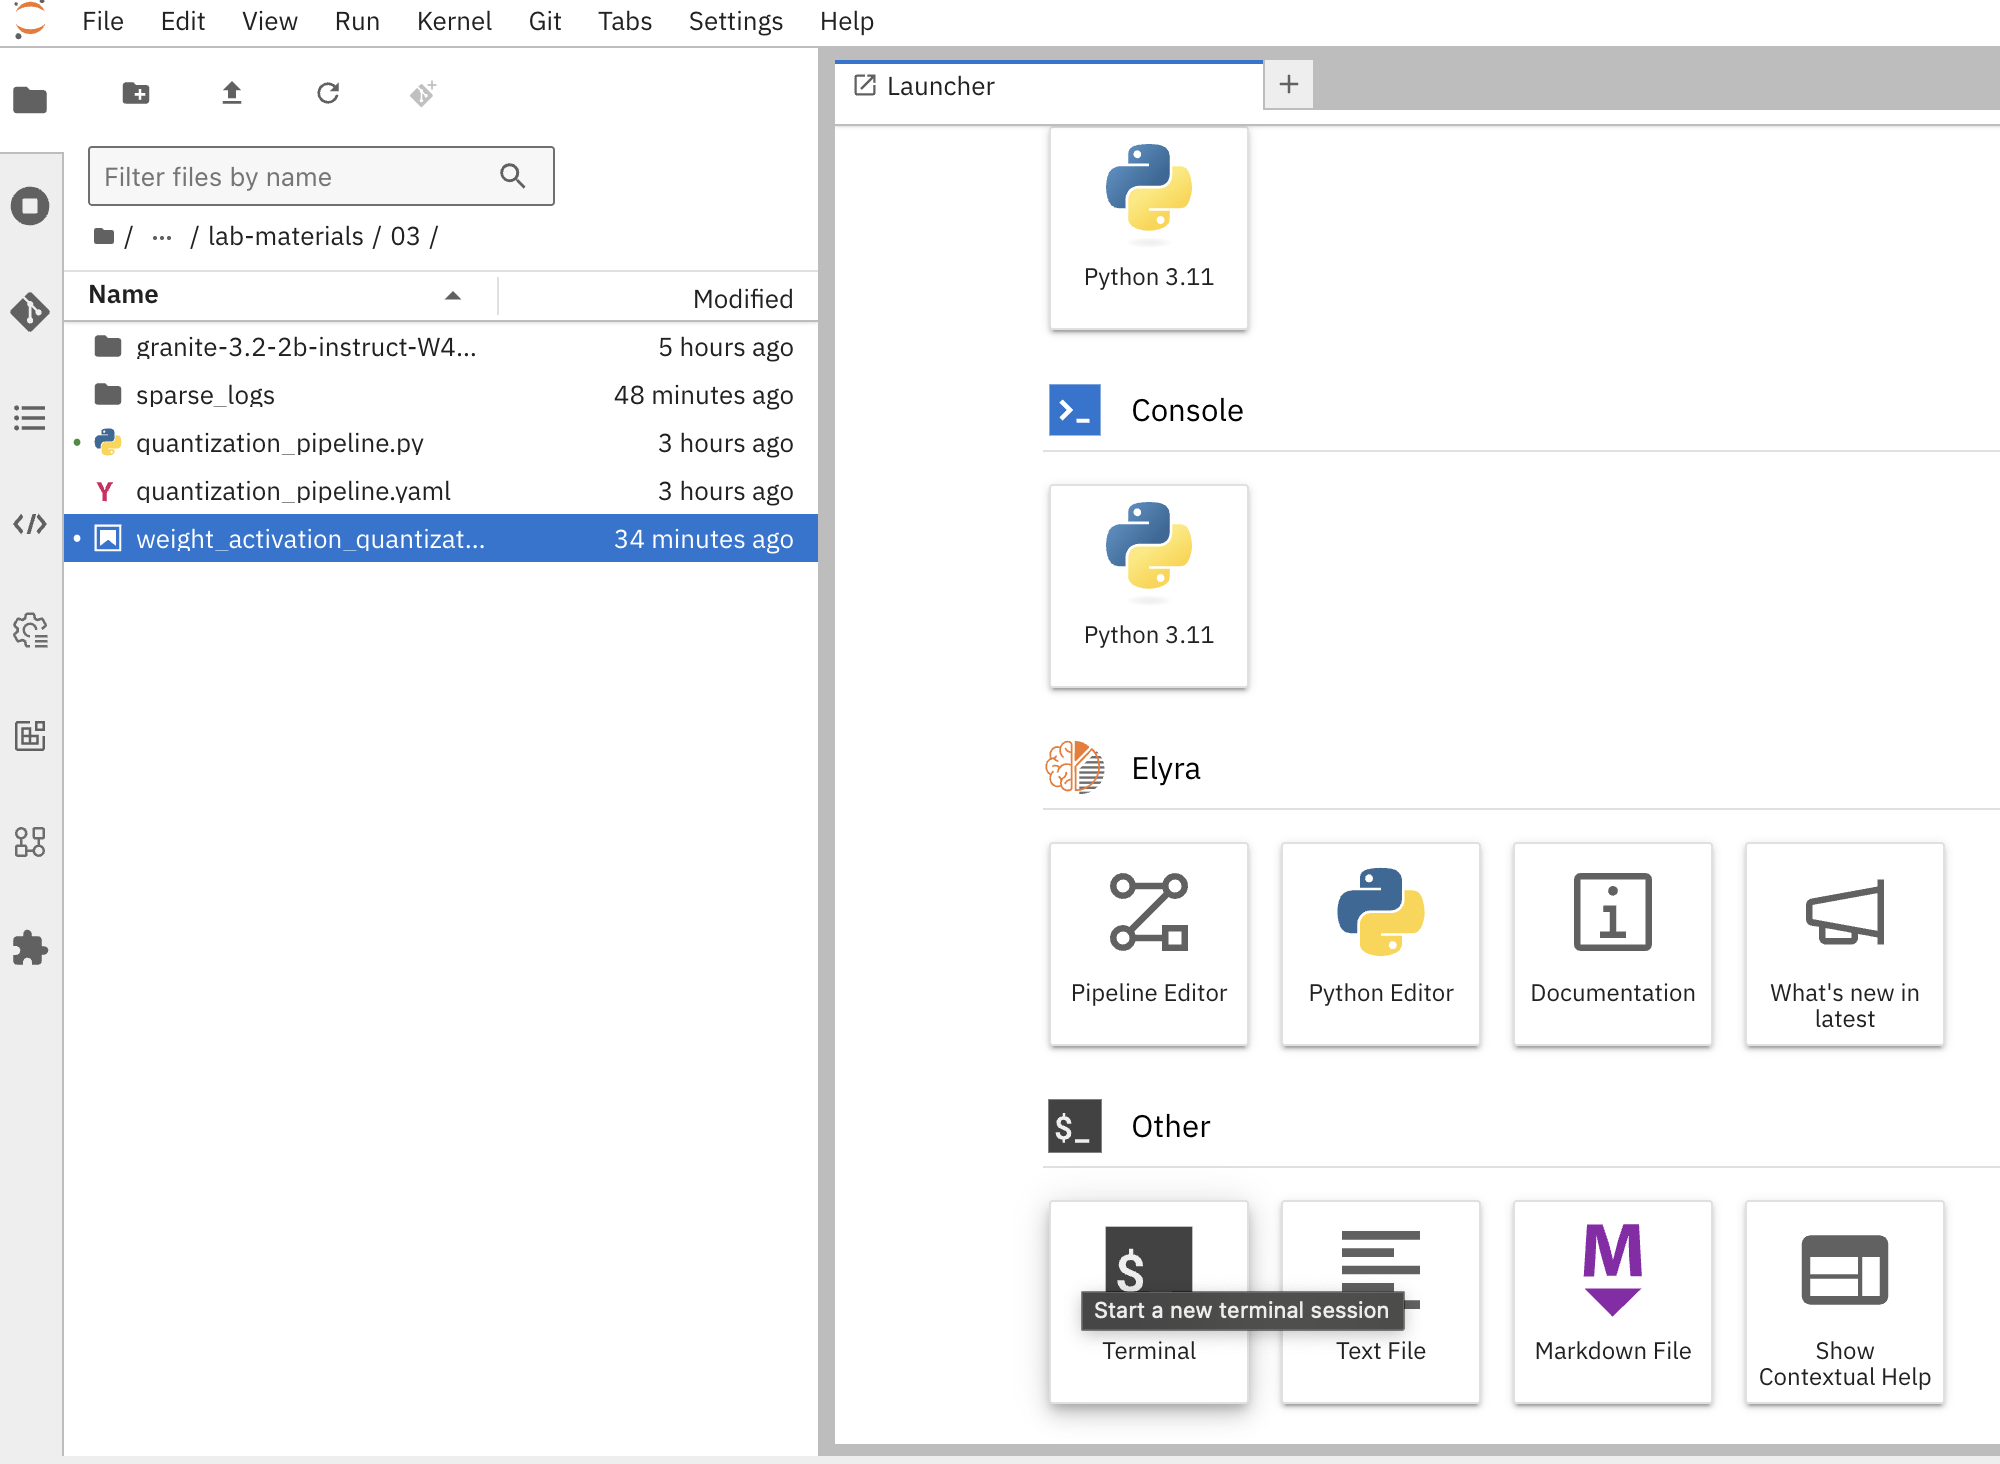 Figure 2. Create Terminal Session in Jupyter Workbench
 -
Install the required dependencies for creating the Kubeflow Pipeline YAML:
pip install -U kfp==2.9.0 kfp-kubernetes==1.3.0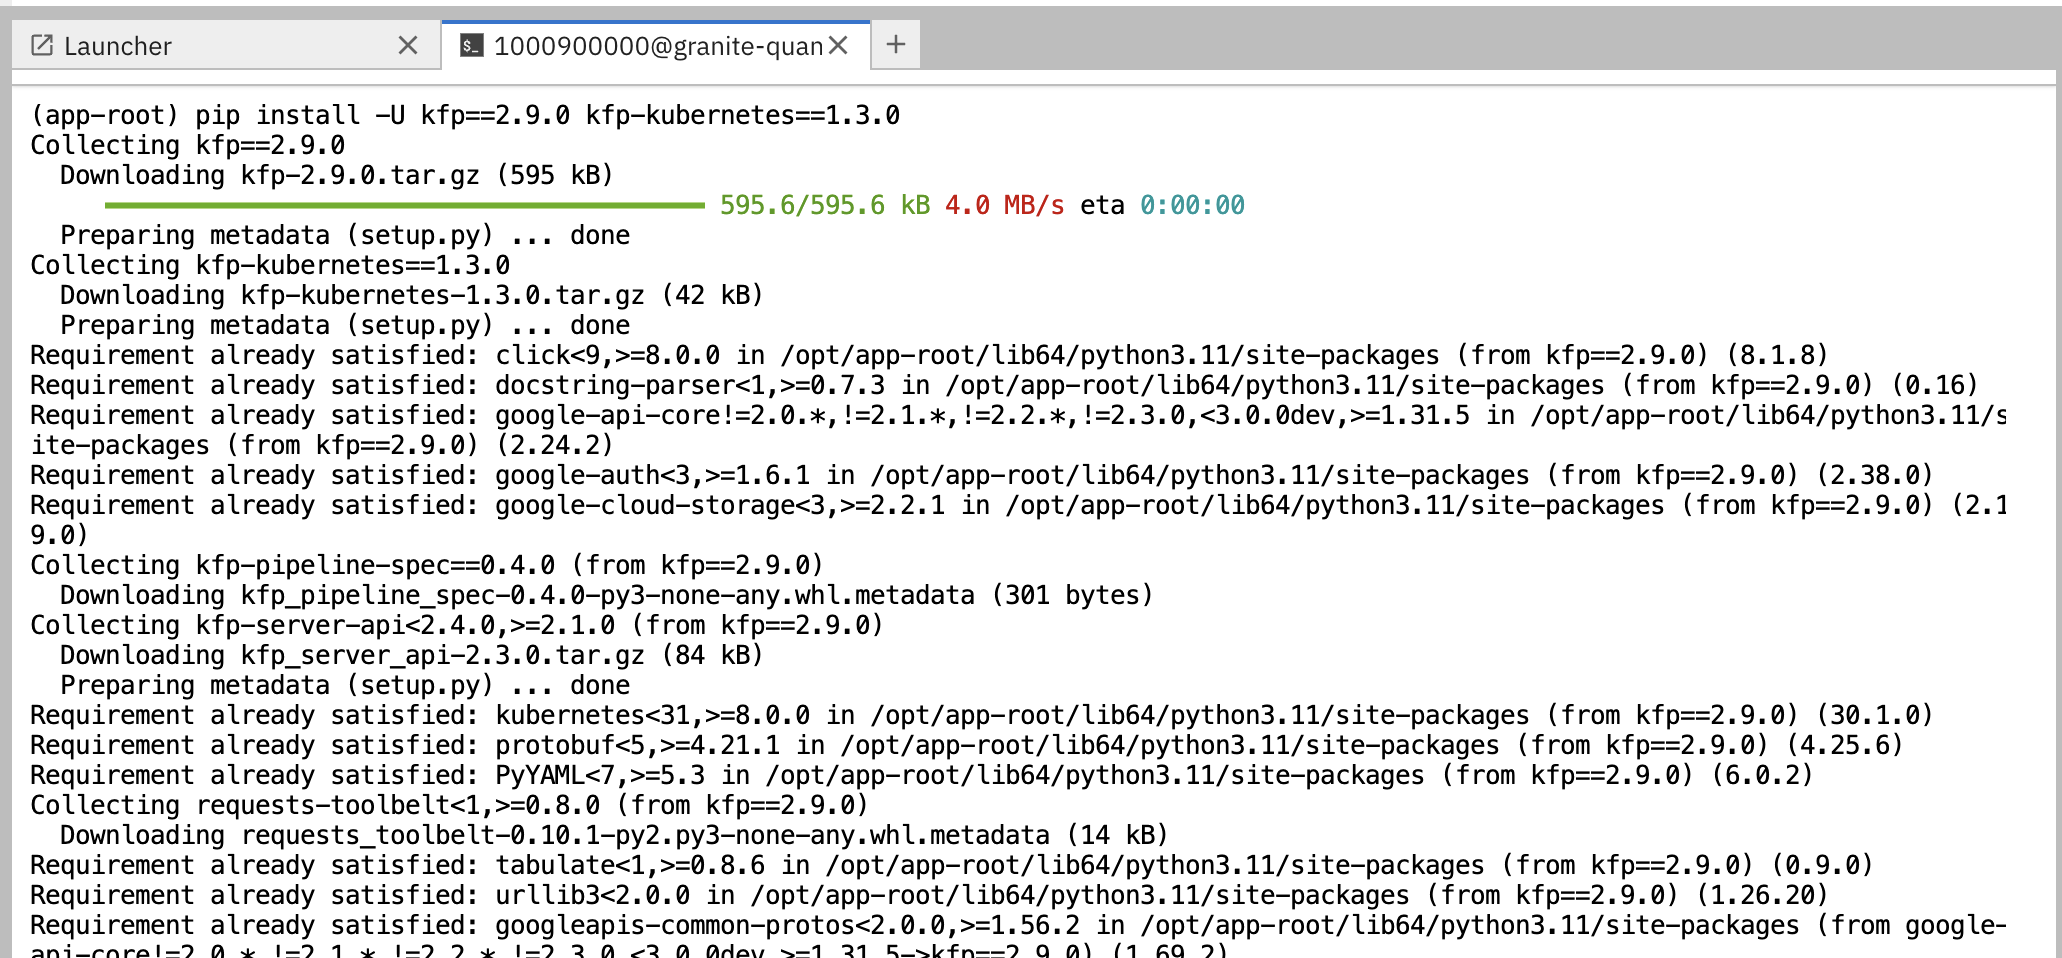 Figure 3. Install Kubeflow Pipeline SDK Dependencies
Building the Pipeline
-
In the Jupyter workbench, open the
quantization_pipeline.pyfile fromoptimization_lab/llm_compressor -
Review the pipeline definition to understand its components and data flow
Pipeline Architecture Overview
Before diving into individual components, let’s understand the overall pipeline structure and data flow:
@dsl.pipeline(...)
def quantization_pipeline(model_s3_path, output_path, quantization_type, use_s3_download):
    pvc = CreatePVC(...)
    # Conditional download path based on pipeline parameter
    with dsl.If(use_s3_download == True):
        download = download_model_from_s3(...)
    with dsl.Else():
        download = download_model_from_hf(...)
    quantize = quantize_model(...)
    upload = upload_model(...)
    evaluate = evaluate_model(...)
    delete_pvc = DeletePVC(...)
    # series of mounts, tolerations, dependencies, cleanup
Pipeline Key Characteristics
Data Flow Architecture:
Conditional Download Path (controlled by use_s3_download parameter):
┌─ S3 (MinIO) → Download S3 ─┐
│                            ├→ PVC → Quantize → PVC → Upload to S3
└─ HuggingFace → Download HF ─┘           ↓
Evaluate ← PVC|
Practical Deployment Considerations: In most client engagements, external internet access to HuggingFace Hub is often blocked or restricted due to security policies. In such environments, the S3 download path ( |
Resource Management:
-
PersistentVolumeClaim: Created dynamically to persist model files across pipeline steps
-
Conditional Execution:
use_s3_downloadparameter controls whether to download from S3 or HuggingFace -
GPU Scheduling: Tolerations (
nvidia.com/gpu) enable scheduling on GPU-enabled nodes -
Shared Storage: PVC mounted across all tasks ensures consistent data access
-
Task Sequencing: conditional download → quantize → (upload & evaluate in parallel) → delete PVC
-
Secret Management: S3 credentials injected securely via
use_secret_as_env()when needed -
GPU Resources: Allocated specifically with
set_accelerator_type/limitfor quantization tasks
Pipeline Components Deep Dive
Let’s examine each component in detail. The pipeline supports two download paths controlled by the use_s3_download parameter:
download_model_from_s3 Component (use_s3_download=True)
@dsl.component(...):
def download_model_from_s3(model_s3_path: str, output_path: str):
    import os
    from boto3 import client
    # Configure S3 client using environment variables
    # List and download all objects from the specified S3 path
    # Maintain directory structure during download
print('Finished downloading model from S3.')Purpose: Downloads the specified model from S3 (MinIO) storage to the shared PVC storage.
Key Functions:
-
Uses
boto3client to connect to S3-compatible storage (MinIO) -
Downloads complete model repository from the specified S3 path
-
Downloads model weights, tokenizer, and configuration files recursively
-
Maintains original directory structure during the download process
-
Stores all artifacts in the shared PVC for subsequent pipeline steps
-
Provides the foundation for the quantization process
Security Features:
-
Uses Kubernetes secrets for S3 credentials (
s3_access_key,s3_secret_access_key) -
Accesses S3 endpoint and bucket information from environment variables
-
Supports secure connections to MinIO storage
download_model_from_hf Component (use_s3_download=False)
@dsl.component(...):
def download_model_from_hf(model_id: str, output_path: str):
    from huggingface_hub import snapshot_download
    import os
    # Download complete model repository from HuggingFace Hub
    # Maintains directory structure and downloads all model files
print('Finished downloading model from HuggingFace.')Purpose: Downloads the specified model from HuggingFace Hub to the shared PVC storage.
Key Functions:
-
Uses
huggingface_hub.snapshot_downloadto fetch complete model repositories -
Downloads model weights, tokenizer, configuration files, and additional assets
-
Provides an alternative to S3/MinIO storage for public models
-
Stores all artifacts in the shared PVC for subsequent pipeline steps
-
Supports direct access to thousands of pre-trained models on HuggingFace Hub
quantize_model Component
@dsl.component(...):
def quantize_model(model_path: str, output_path: str, quantization_type: str):
    # 1) load HF model/tokenizer
    # 2) gather calibration data from a dataset
    # 3) build SmoothQuant + GPTQ pipeline, depending on `quantization_type`
    # 4) call `oneshot()`
# 5) save compressed model + tokenizerPurpose: Performs the core quantization process on the downloaded model.
Key Functions:
-
Model Loading: Loads model and tokenizer with automatic device mapping (
device_map="auto") -
Calibration Data: Gathers sample data from HuggingFace datasets for quantization statistics
-
Quantization Recipe: Applies W4A16 quantization using SmoothQuant + GPTQ techniques
-
Processing: Executes
oneshot()method for calibration and model compression -
Output: Saves compressed model artifacts with
save_compressed=True
Key Details:
-
Supports both
int4andint8quantization types -
Uses GPU acceleration for faster processing
-
Maintains model quality through careful calibration
upload_model Component
@dsl.component(...):
def upload_model(model_path: str, s3_path: str):
    # Uses boto3 with env secrets for S3 endpoint
# Walk through model_path folder and upload each filePurpose: Uploads the quantized model artifacts to S3-compatible storage.
Key Functions:
-
S3 Configuration: Uses boto3 with credentials from mounted Kubernetes secrets
-
File Processing: Iterates through all model files in the specified directory
-
Batch Upload: Transfers model weights, tokenizer, and configuration files
-
Storage Organization: Maintains file structure and naming conventions in S3
Security:
-
Accesses S3 credentials securely via environment variables (
s3_host,s3_access_key) -
Uses the
minio-modelssecret configured in your data connection
evaluate_model Component
@dsl.component(...):
def evaluate_model(model_path: str):
    # Constructs 'lm_eval' vLLM shell command
    # Runs GSM8K few-shot evaluation
# Captures and prints outputPurpose: Evaluates the quantized model’s performance using standardized benchmarks.
Key Functions:
-
Benchmark Testing: Runs GSM8K few-shot evaluation to measure model quality
-
Command Construction: Builds
lm_evalcommands with vLLM backend for efficient inference -
Performance Metrics: Captures accuracy and performance statistics
-
Results Reporting: Prints evaluation outputs for analysis
Compiling the Pipeline
Follow these steps to compile the pipeline into a YAML file for OpenShift AI:
Before compiling, verify your data connection name. If you haven’t used minio-models as your data connection name, you must update the line secret_name = "minio-models" in the pipeline code to match your actual data connection name (lowercase, spaces removed).
|
-
In the terminal of the Jupyter workbench, open the
quantization_pipeline.pyfile in your workbench -
Execute the pipeline compilation:
python quantization_pipeline.py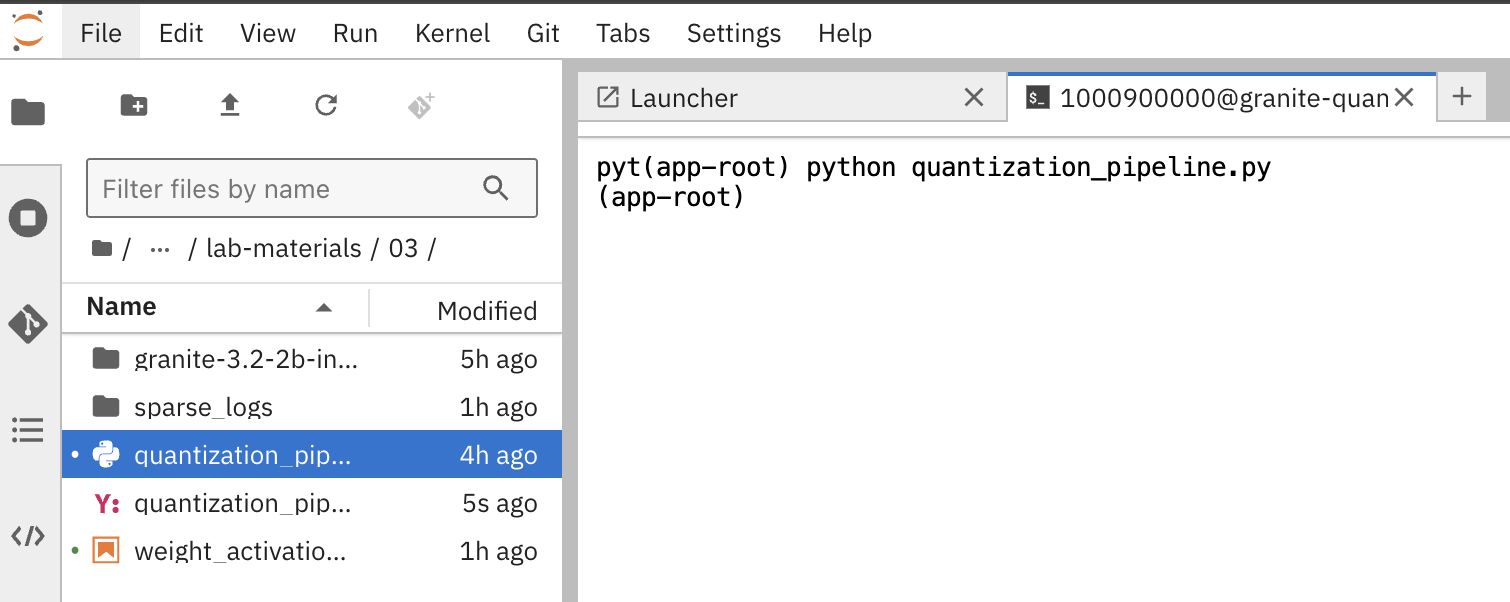 Figure 4. Execute Pipeline Compilation in Terminal
Validation Step
Verify successful compilation:
-
quantization_pipeline.yamlfile is created in the current directory -
No error messages appear in the terminal output
-
Check file contents:
ls -la quantization_pipeline.yaml -
Download the generated
quantization_pipeline.yamlfile to your local machine: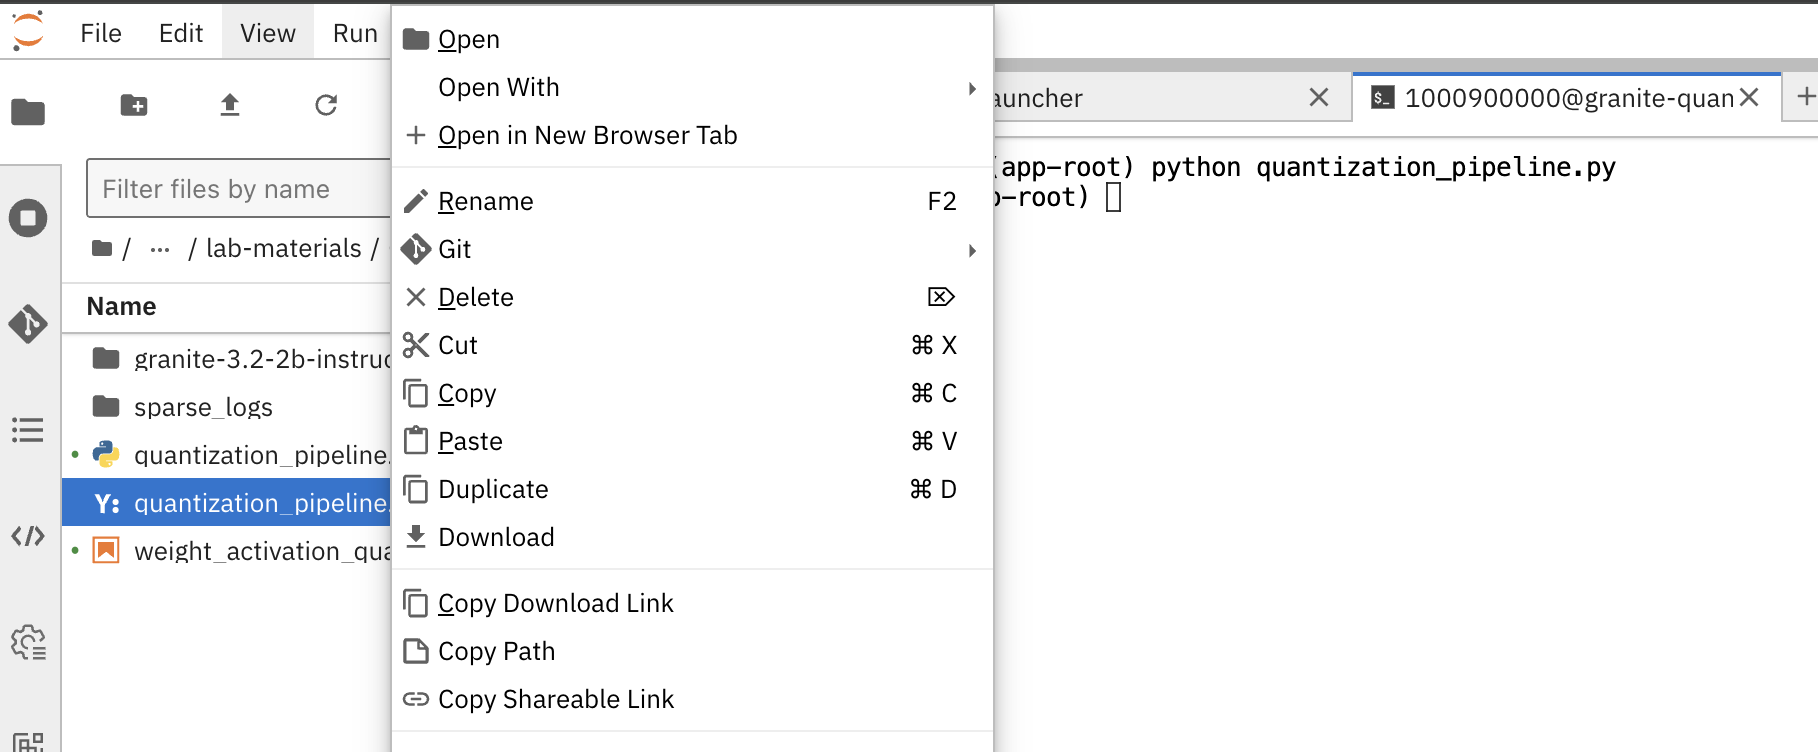 Figure 5. Download Pipeline YAML File from Workbench
 -
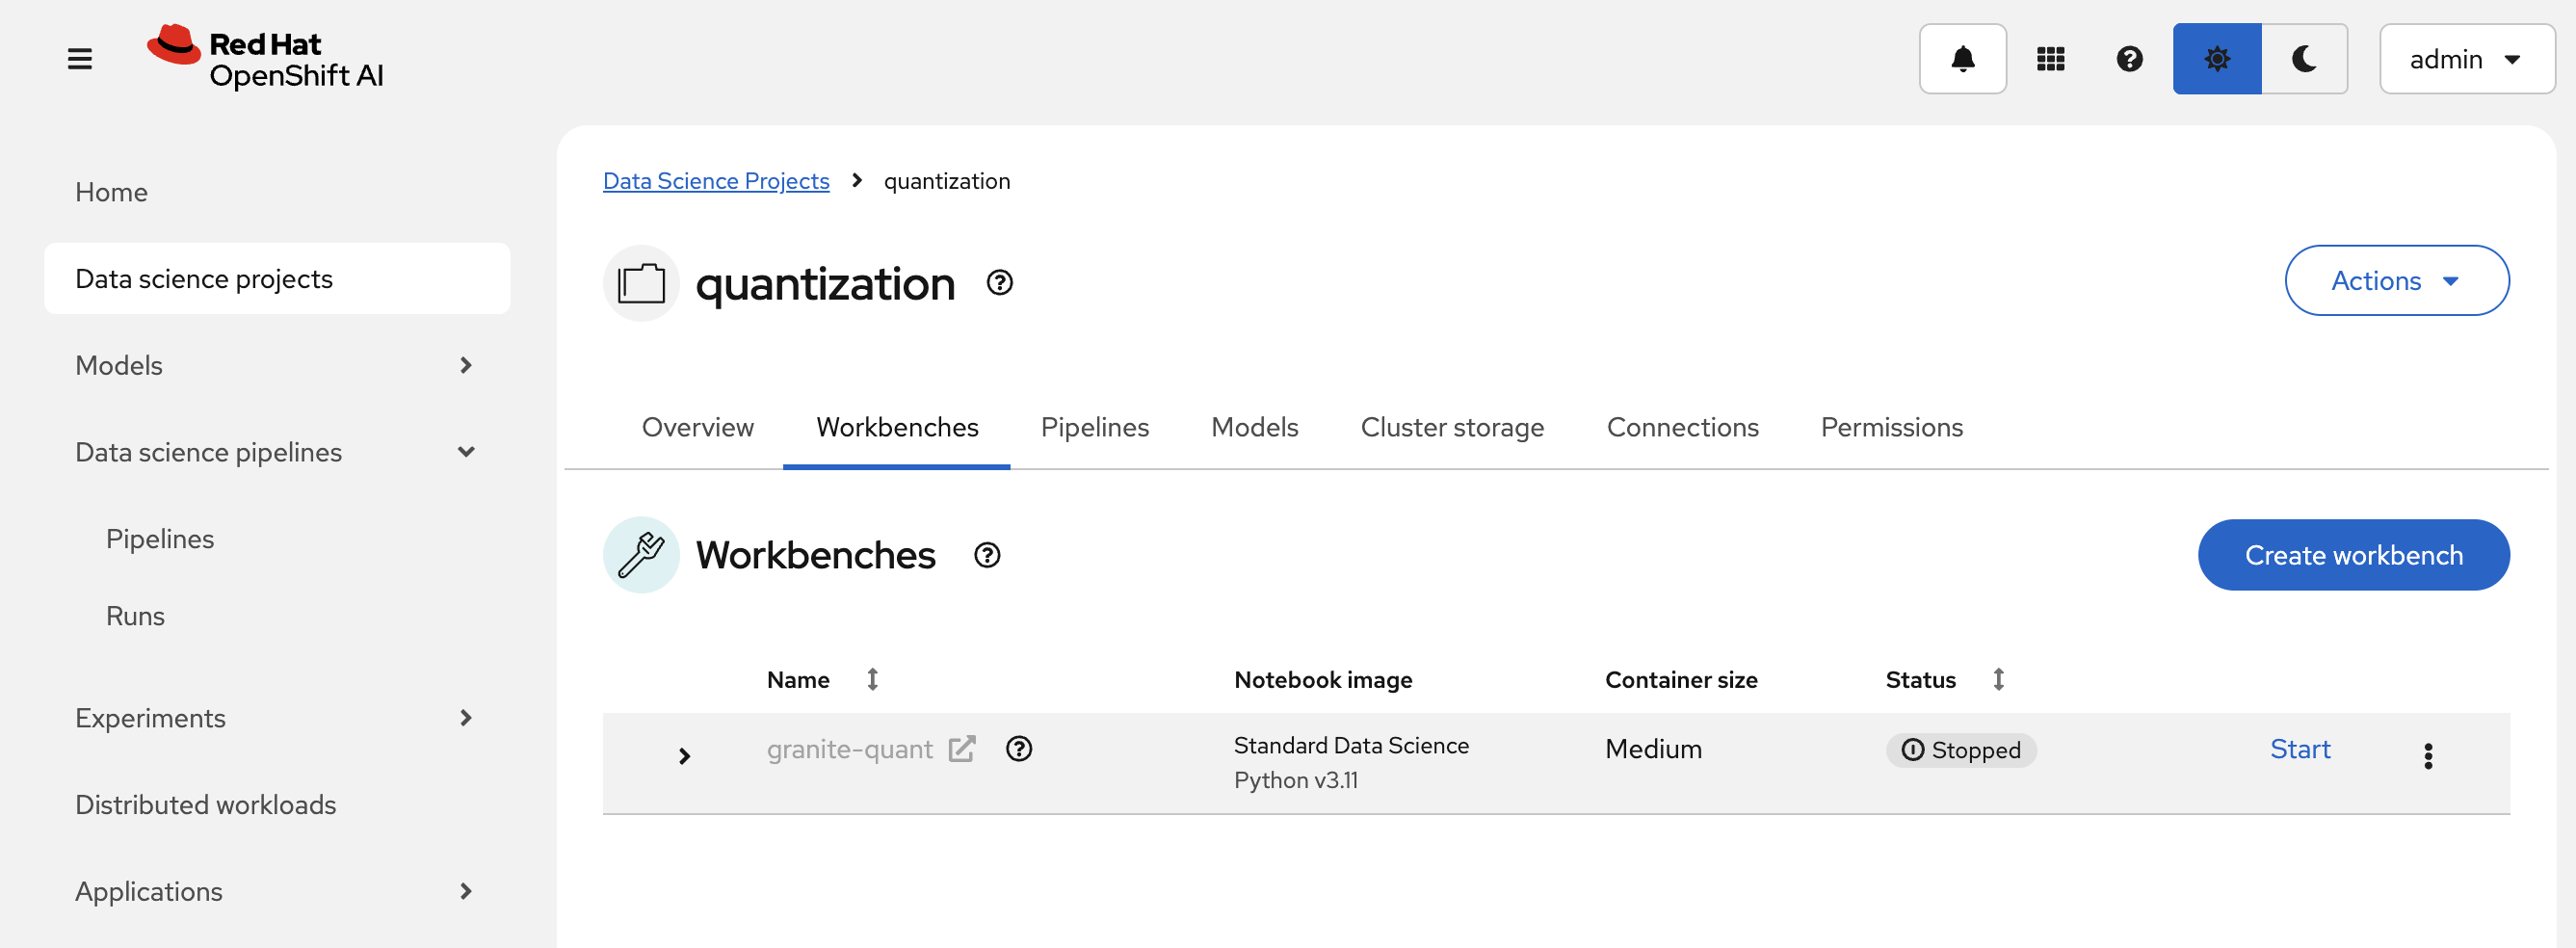
Once you have the pipeline file, stop the workbench to free resources:
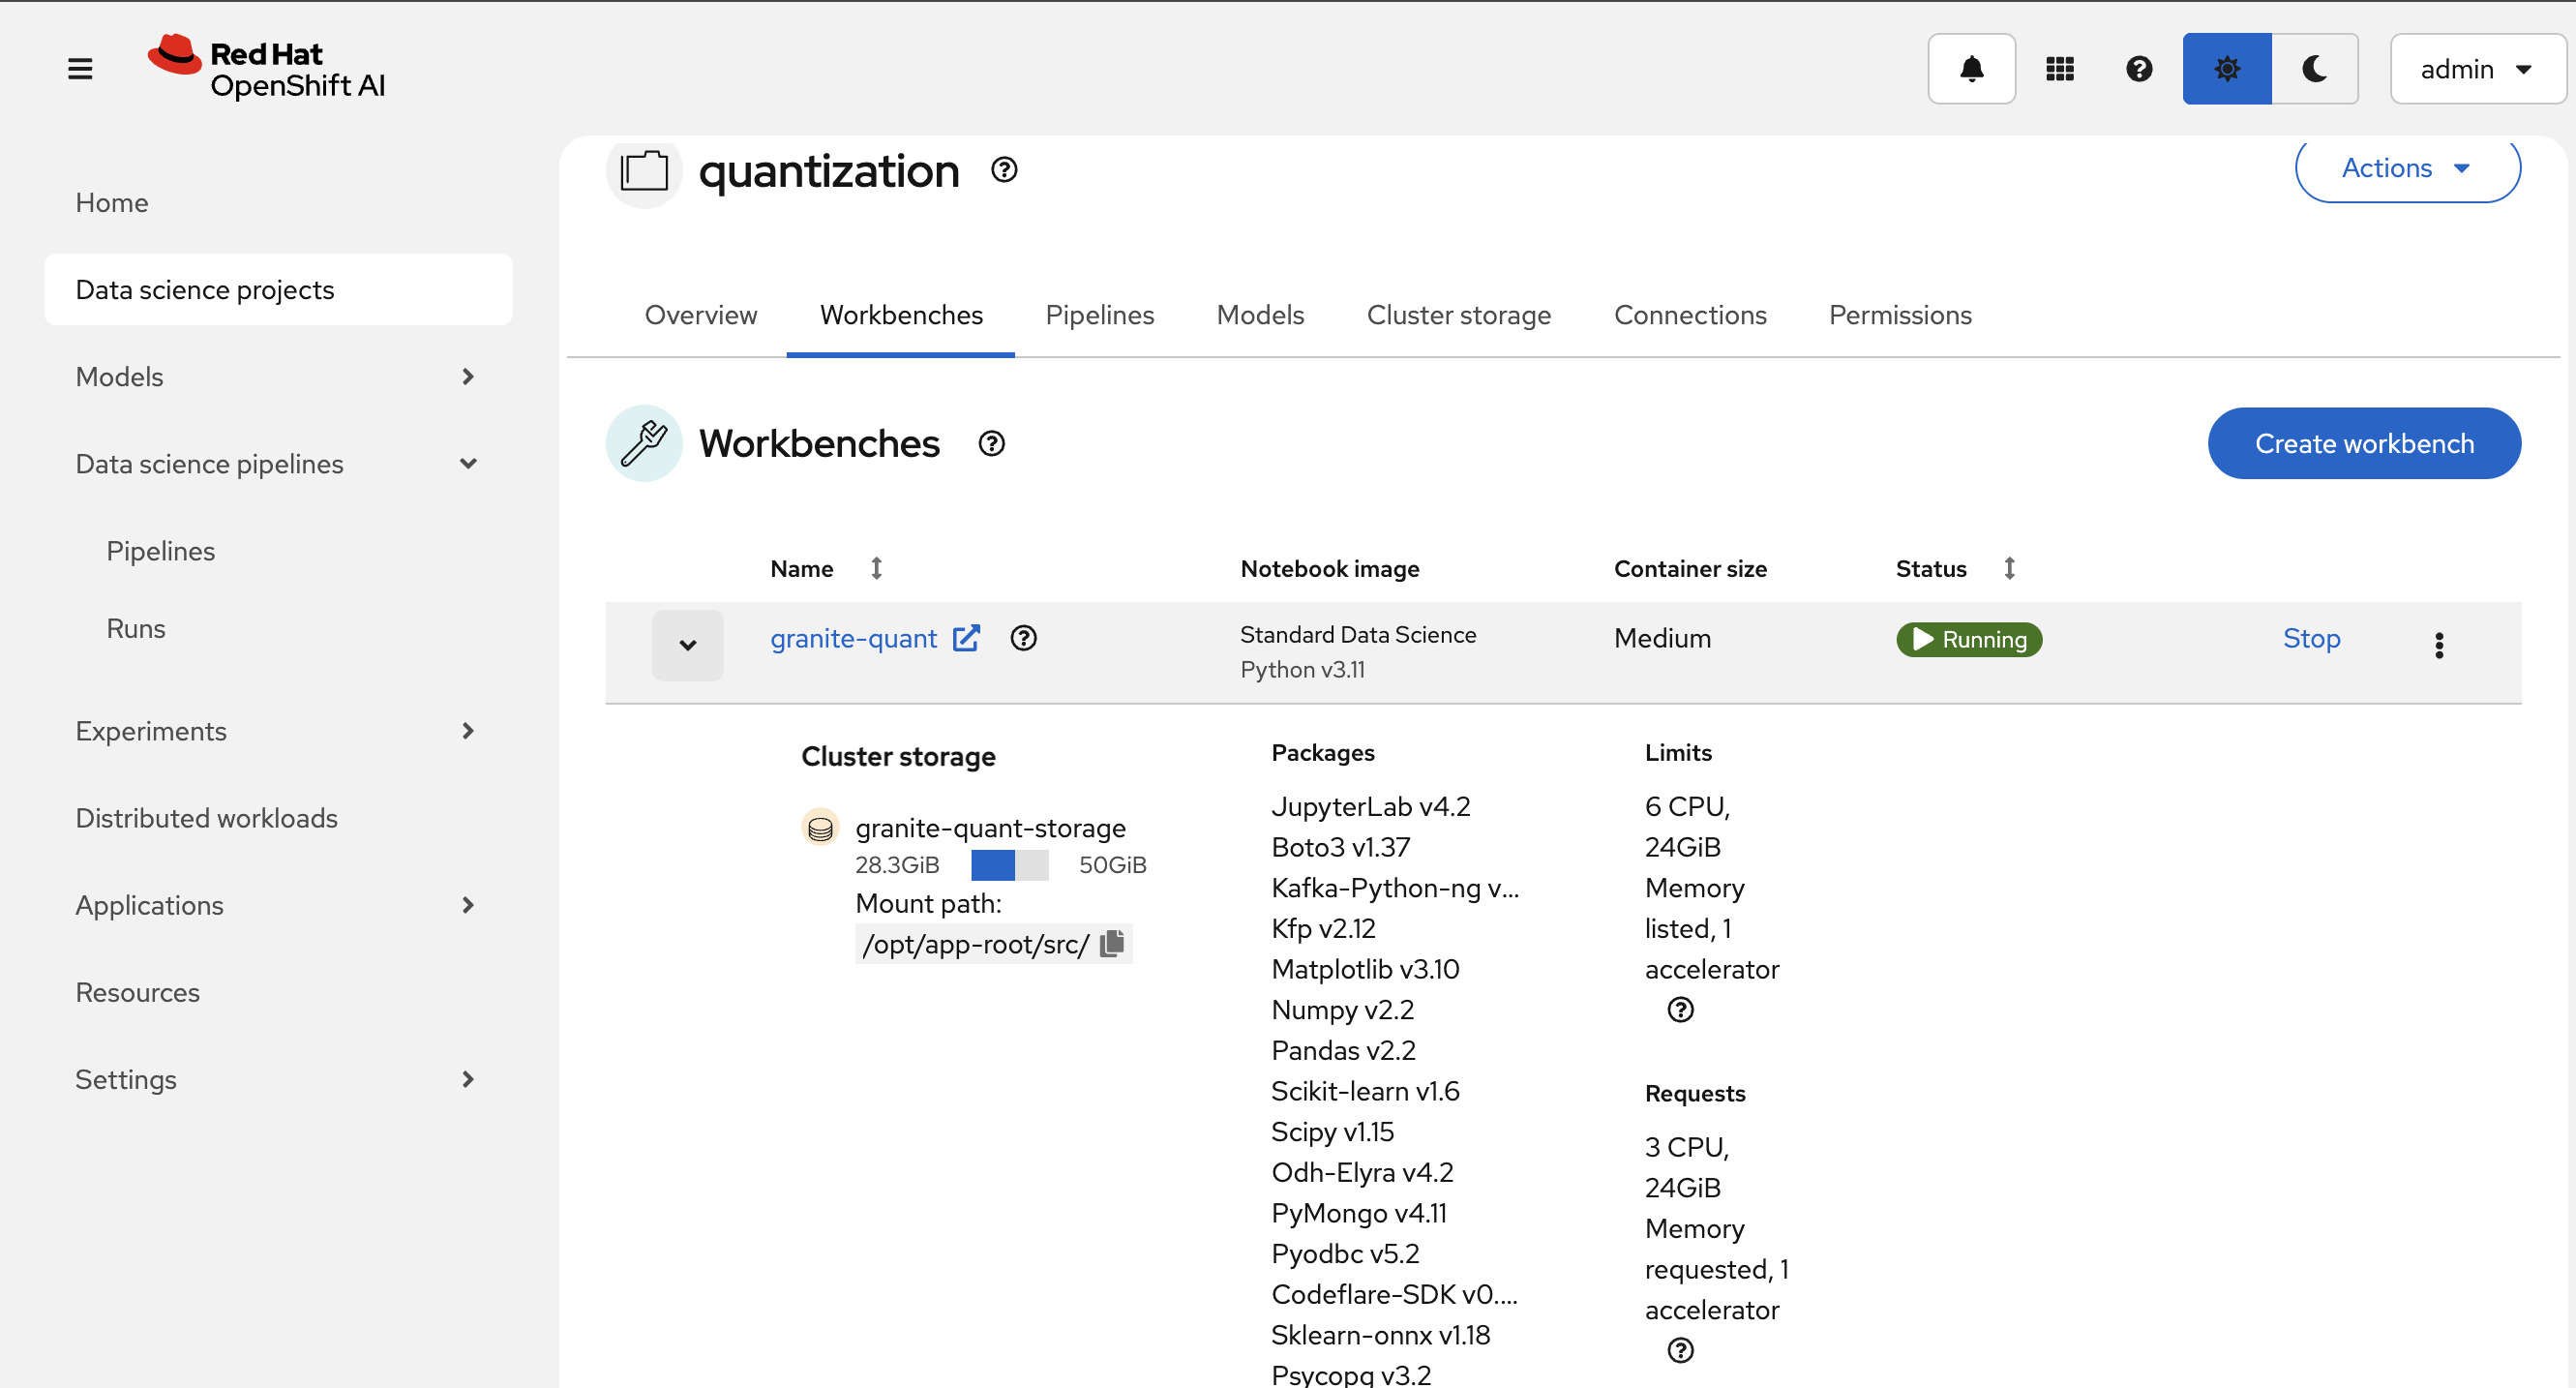 Figure 6. Access Workbench Actions Menu
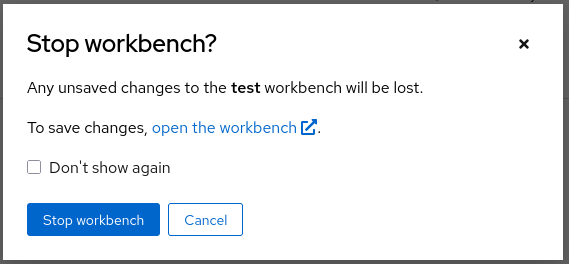 Figure 7. Stop Workbench to Free GPU Resources
Running Your Pipeline
Follow these steps to import and execute the pipeline in OpenShift AI:
Pipeline runs can be triggered either from the OpenShift AI pipelines dashboard user interface or using the Kubeflow Pipelines REST APIs. In this lab, we’ll use the API method.
To trigger the pipeline import and execution, you can use the following Kubeflow Pipelines REST APIs. Be sure to replace example values with your own as needed.
1. Obtain the Kubeflow Pipelines API Route
First, get the OpenShift route for the Kubeflow Pipelines REST API. This is needed to construct the correct API endpoint URL:
oc get route ds-pipeline-dspa --template='{{ .spec.host }}' -n quantizationThis will output a hostname like:
ds-pipeline-dspa-quantization.apps.cluster-xxxx.xxxx.sandboxNNN.opentlc.com
2. Get your access token
The Kubeflow Pipelines API route is secured using OpenShift OAuth, so you need to obtain a Bearer token for authentication. You can get your token with:
oc whoami --show-tokenCopy the output token for use in the Authorization header.
3. Import (Upload) the Pipeline YAML
Use the following curl command to upload your pipeline YAML file to the OpenShift AI pipelines API:
curl -X POST "https://<ROUTE>/apis/v2beta1/pipelines/upload" \
  -H "Authorization: Bearer <YOUR_TOKEN>" \
  -F "uploadfile=@/path/to/quantization_pipeline.yaml" \
  -F "name=quantization-pipeline" \
  -F "display_name=Model Quantization Pipeline" \
  -F "description=Pipeline for quantizing and evaluating models" \
  -F "namespace=quantization"
Parameter details:
-
<ROUTE>: The host you obtained in step 1 above. -
<YOUR_TOKEN>: The token from step 2. -
uploadfile: Path to your pipeline YAML file. -
name: Internal pipeline name (no spaces). -
display_name: Human-readable name shown in the UI. -
description: (Optional) Description of the pipeline. -
namespace: The OpenShift project/namespace (e.g.,quantization).
If successful, the response will include a pipeline_id you will need for the next step.
4. Run the Pipeline
After uploading, trigger a pipeline run with:
curl -X POST "https://<ROUTE>/apis/v2beta1/runs" \
  -H "Authorization: Bearer <YOUR_TOKEN>" \
  -H "Content-Type: application/json" \
  -d '{
    "pipeline_version_reference": {
      "pipeline_id": "<PIPELINE_ID>"
    },
    "runtime_config": {
      "parameters": {
        "model_s3_path": "ibm-granite/granite-3.3-2b-instruct",
        "output_path": "granite-int4-pipeline",
        "quantization_type": "int4",
        "use_s3_download": false
      }
    },
    "display_name": "quantization-run-001"
  }'
Parameter details:
-
<ROUTE>: The hostname from step 1. -
<YOUR_TOKEN>: The token from step 2. -
<PIPELINE_ID>: The pipeline ID returned from the upload step. -
runtime_config.parameters: Set pipeline parameters as needed:-
model_s3_path: S3 path to the pre-uploaded model (used whenuse_s3_download=true) -
model_id: HuggingFace model identifier (used whenuse_s3_download=false) -
output_path: Output directory name for the quantized model -
quantization_type: Quantization method (int4orint8) -
use_s3_download:truefor S3 download,falsefor HuggingFace download
-
-
display_name: Name for this run (appears in the UI).
|
Example for HuggingFace Download: To use HuggingFace download instead, modify the parameters: Note: When using HuggingFace download, the |
Now, if you go to the OpenShift AI web console pipelines tab, you’ll see that the pipeline has been created and the run has been executed.
For more details on the available Kubeflow Pipelines (KFP) APIs—including how to list, manage, and interact with pipelines, runs, and experiments—refer to the upstream KFP API documentation.
Manual upload and run: Running the pipeline via the OpenShift AI Web Console
|
You can also launch the pipeline directly from the OpenShift AI web console, which offers an intuitive graphical interface for importing and running pipelines. This method is optional—use it if you prefer a visual workflow or have not already started a run via the KFP REST API. |
Pipeline Import Process
-
Log into your OpenShift AI dashboard
-
In the project
quantization, navigate to Data Science Pipelines → Pipelines -
Click Import Pipeline:
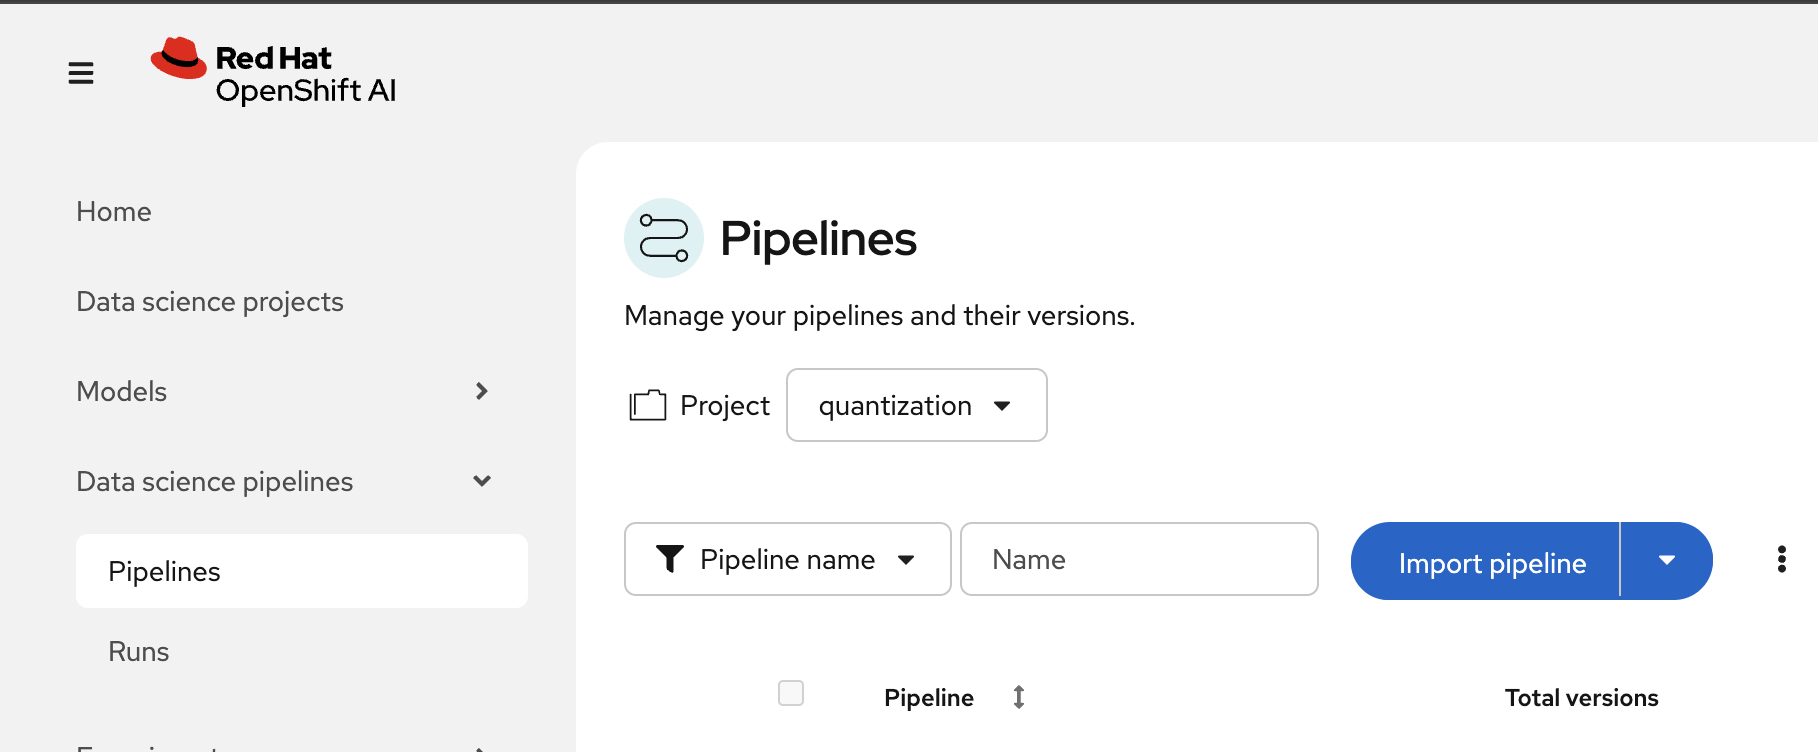 Figure 9. Import Pipeline Button in OpenShift AI
 -
Enter a descriptive Pipeline name, such as:
Model Quantization Pipeline -
Choose Upload and select your generated
quantization_pipeline.yamlfile: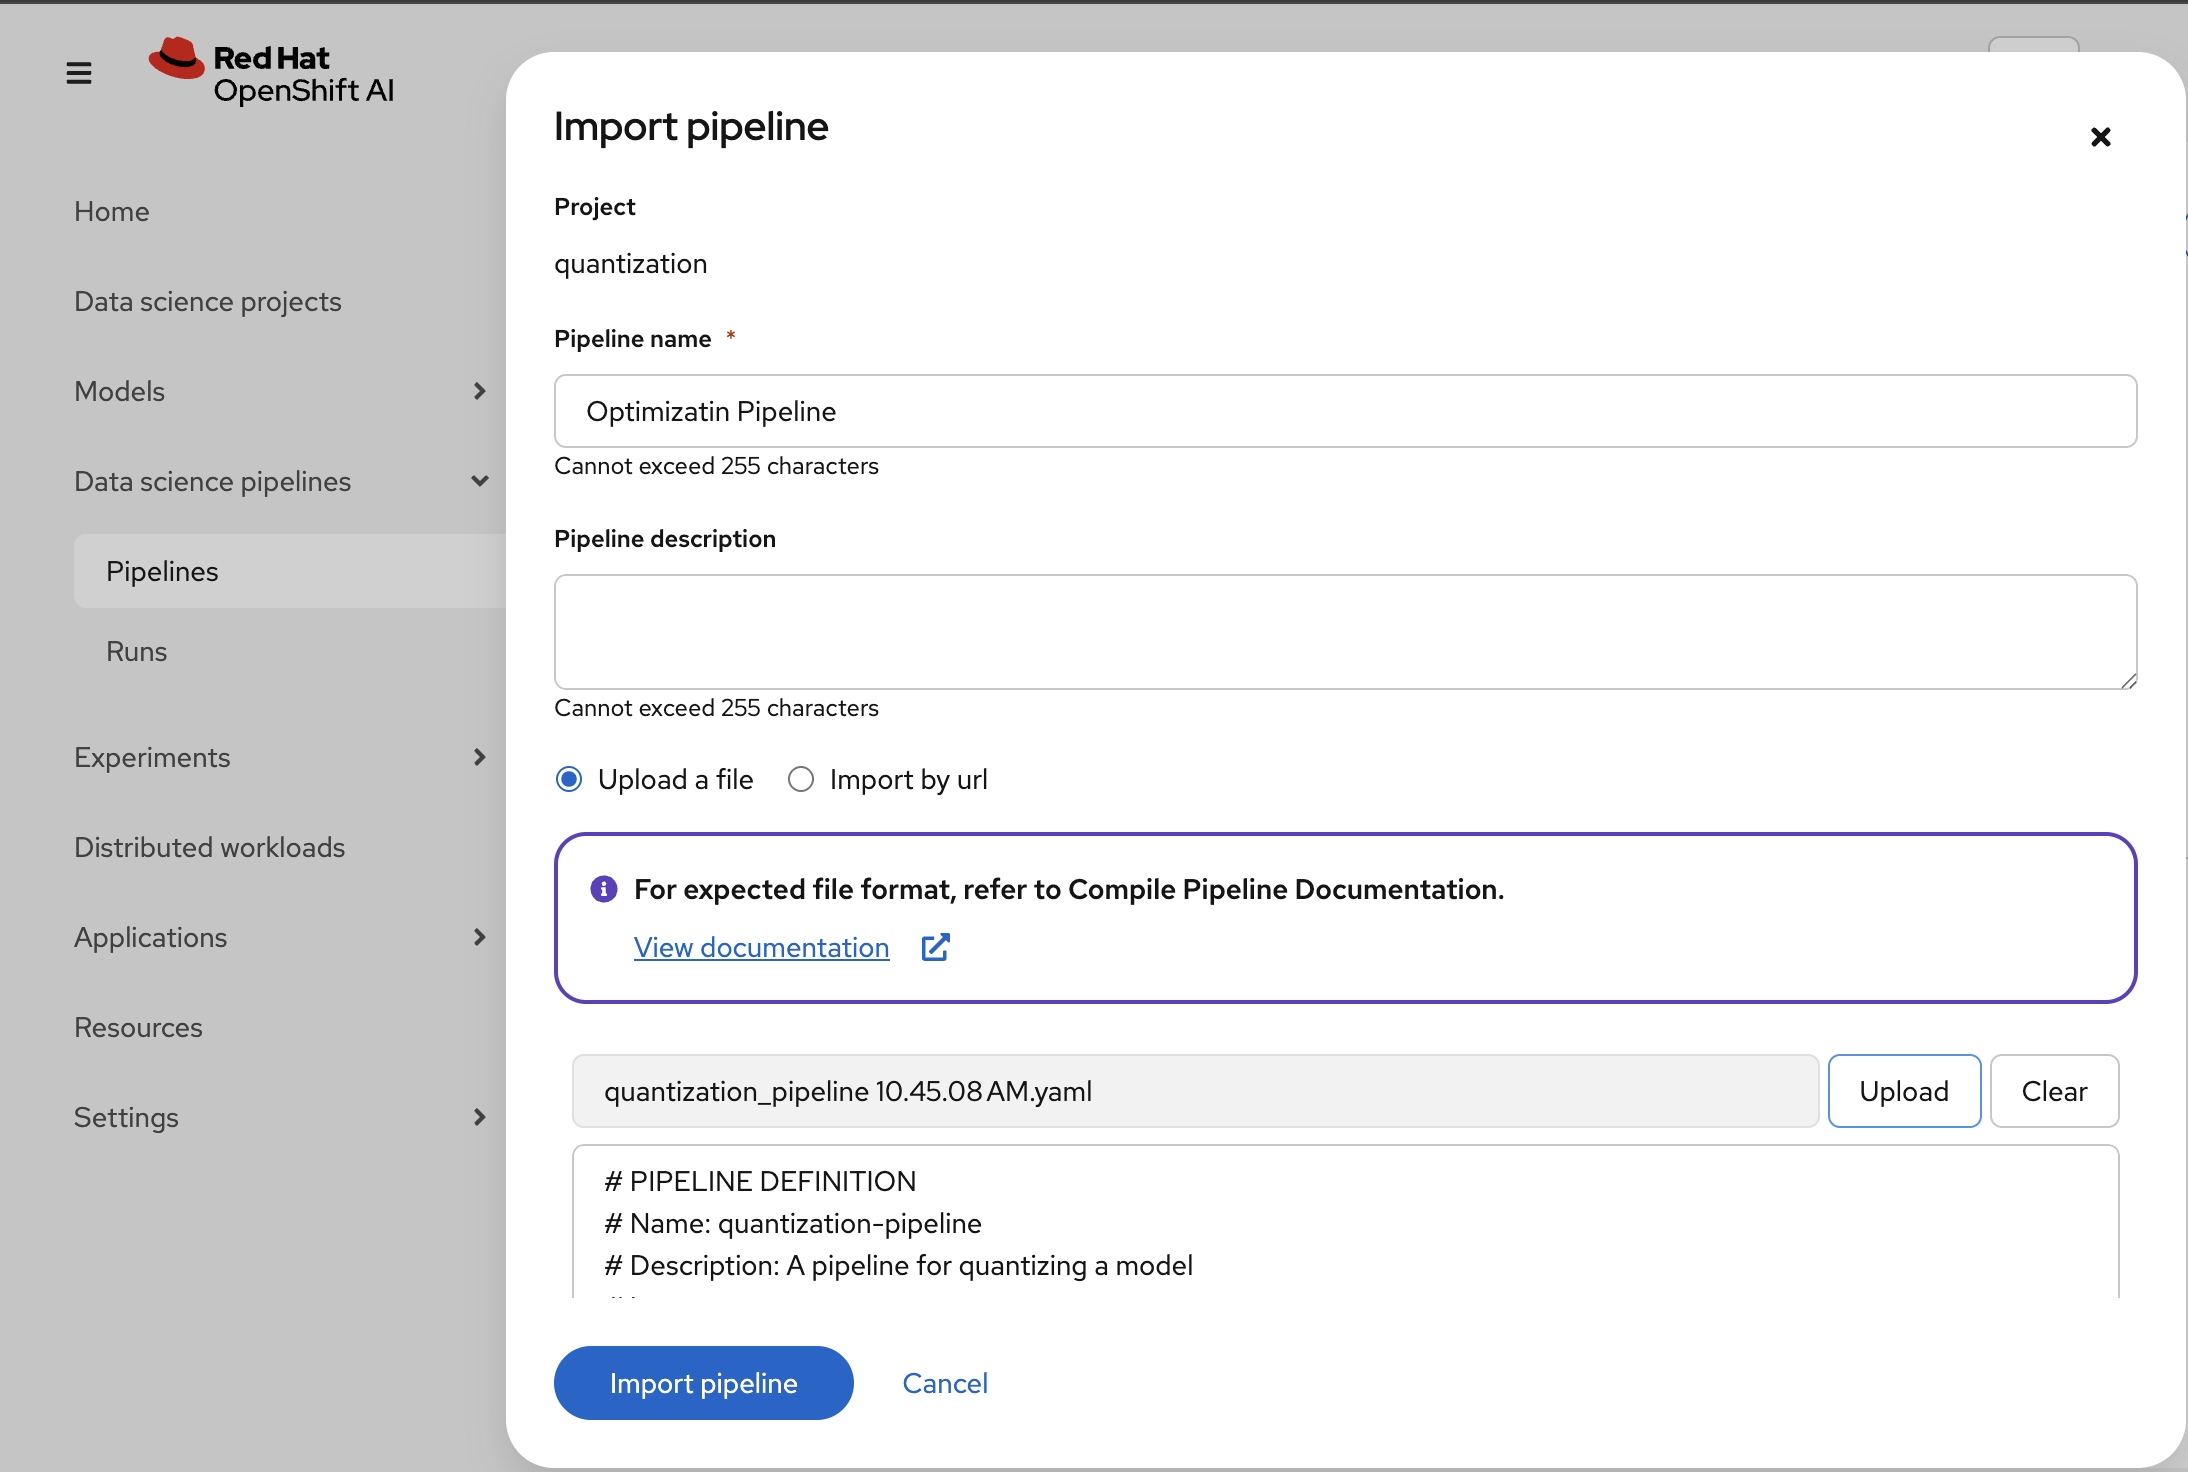 Figure 10. Upload Pipeline YAML File for Import
 -
Click Import pipeline to complete the import process
-
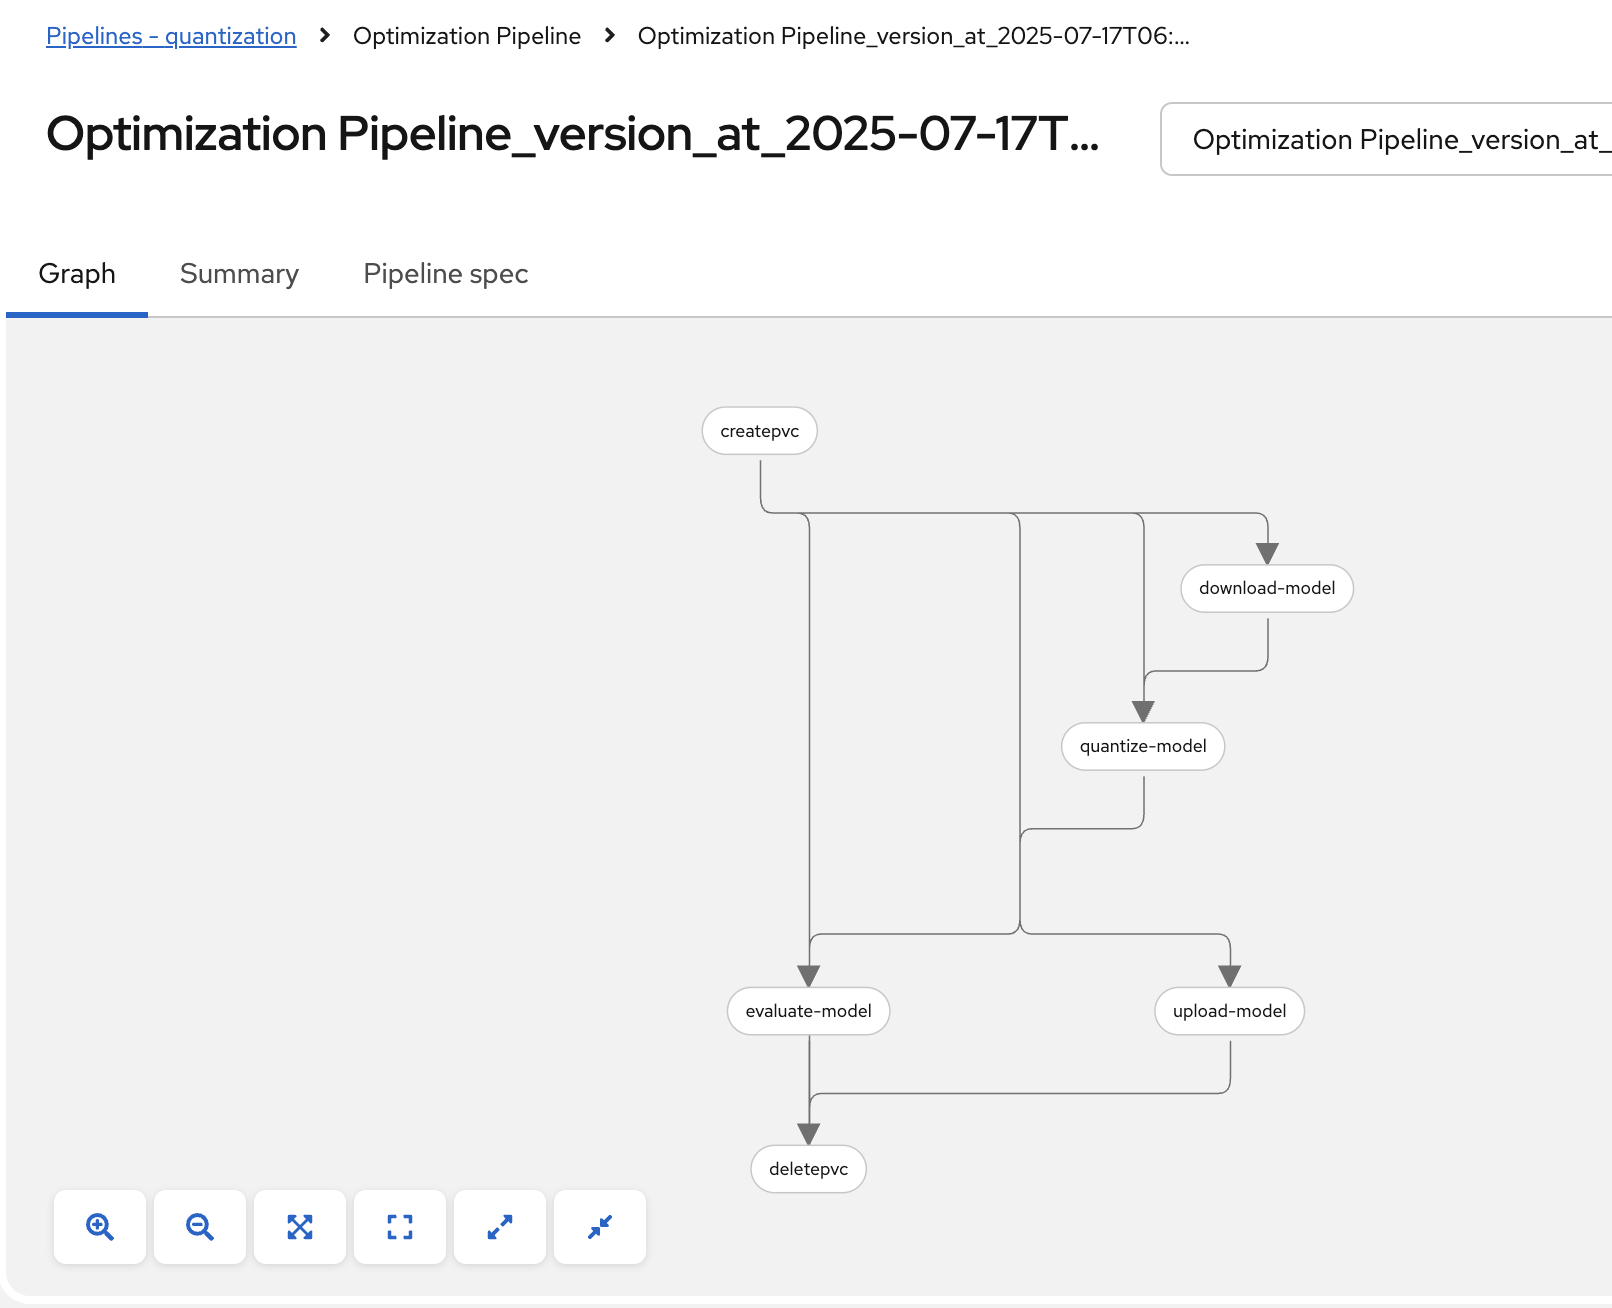
Review the pipeline graph to verify all components are connected correctly:
Figure 11. Pipeline Graph Showing Connected Components
Validation Step
Verify successful pipeline import:
-
Pipeline appears in the pipelines list with correct name
-
Pipeline graph displays all 6 components (CreatePVC, Download, Quantize, Upload, Evaluate, DeletePVC)
-
All components are properly connected with dependency arrows
-
No import error messages are displayed
Pipeline Execution
-
To start a pipeline run, click the Actions button and select Create run:
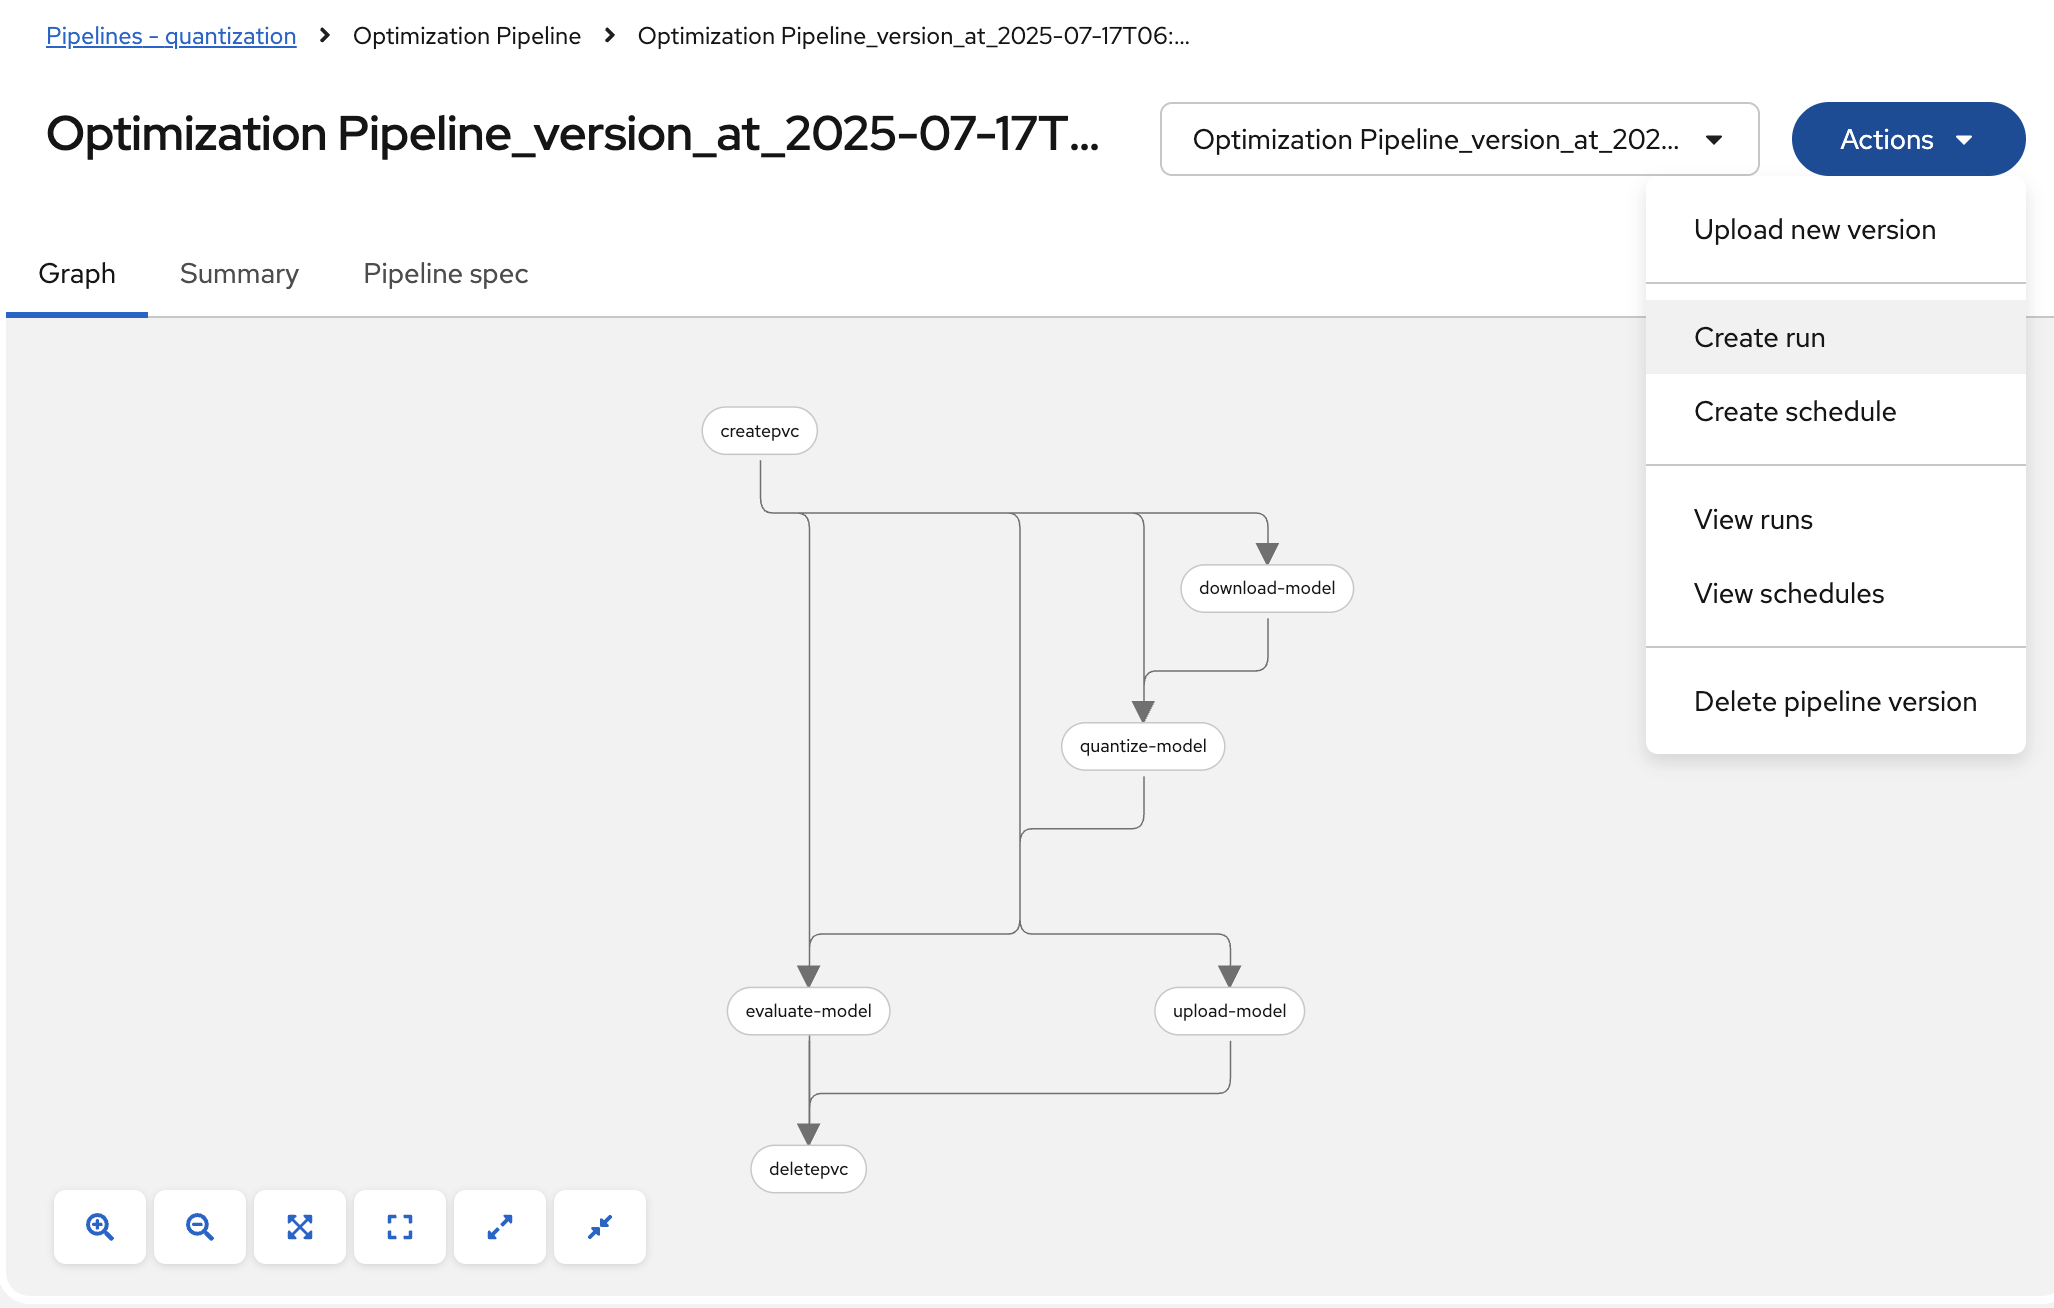 Figure 12. Create New Pipeline Run from Actions Menu
 -
Configure the pipeline parameters in the run creation form:
-
Name: Provide a descriptive run name, e.g.,
quantization-granite-3.3-2b-instruct -
model_s3_path: S3 path to the pre-uploaded model (used when
use_s3_download=true) (default:ibm-granite/granite-3.3-2b-instruct) -
model_id: HuggingFace model identifier (used when
use_s3_download=false) (default:ibm-granite/granite-3.3-2b-instruct) -
output_path: Directory name for the quantized model (default:
granite-int4-pipeline) -
quantization_type: Quantization method to apply (options:
int4orint8, default:int4) -
use_s3_download: Whether to download from S3 (
true) or HuggingFace (false) (default:true)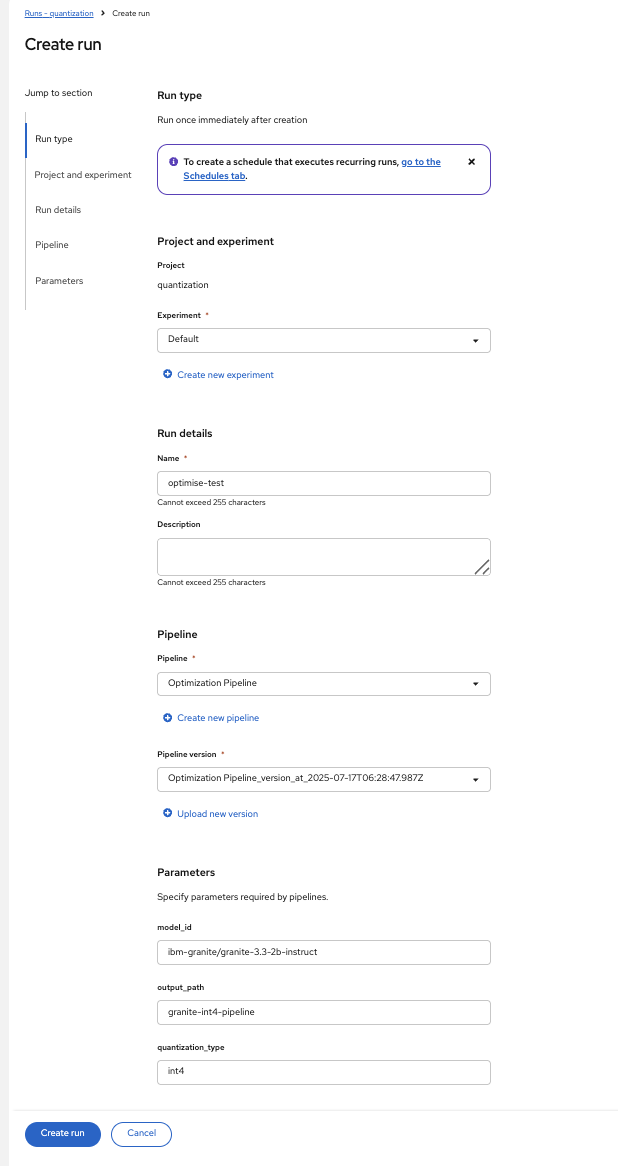 Figure 13. Pipeline Run Parameters Configuration
-
-
Click Create run to start the pipeline execution
-
Monitor the pipeline progress until completion:
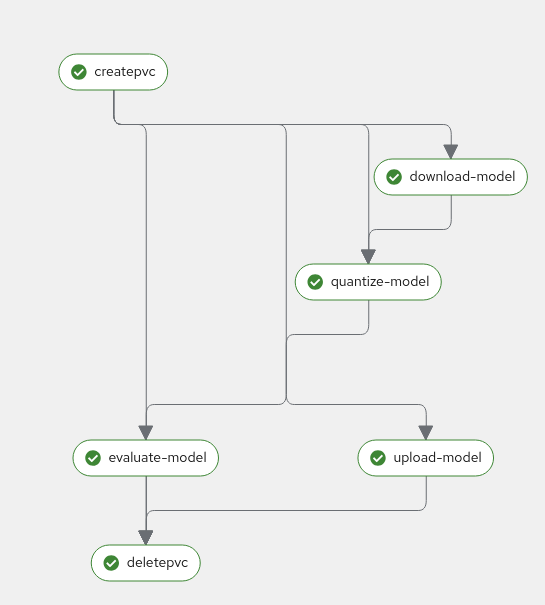 Figure 14. Successful Pipeline Execution Status
Verifying Results
-
Check the model accuracy evaluation results by inspecting the pipeline logs
-
Regardless of the download method used (S3 or HuggingFace), the quantized model is always uploaded to S3 storage
-
Access the MinIO S3 dashboard and verify that the quantized model has been uploaded successfully:
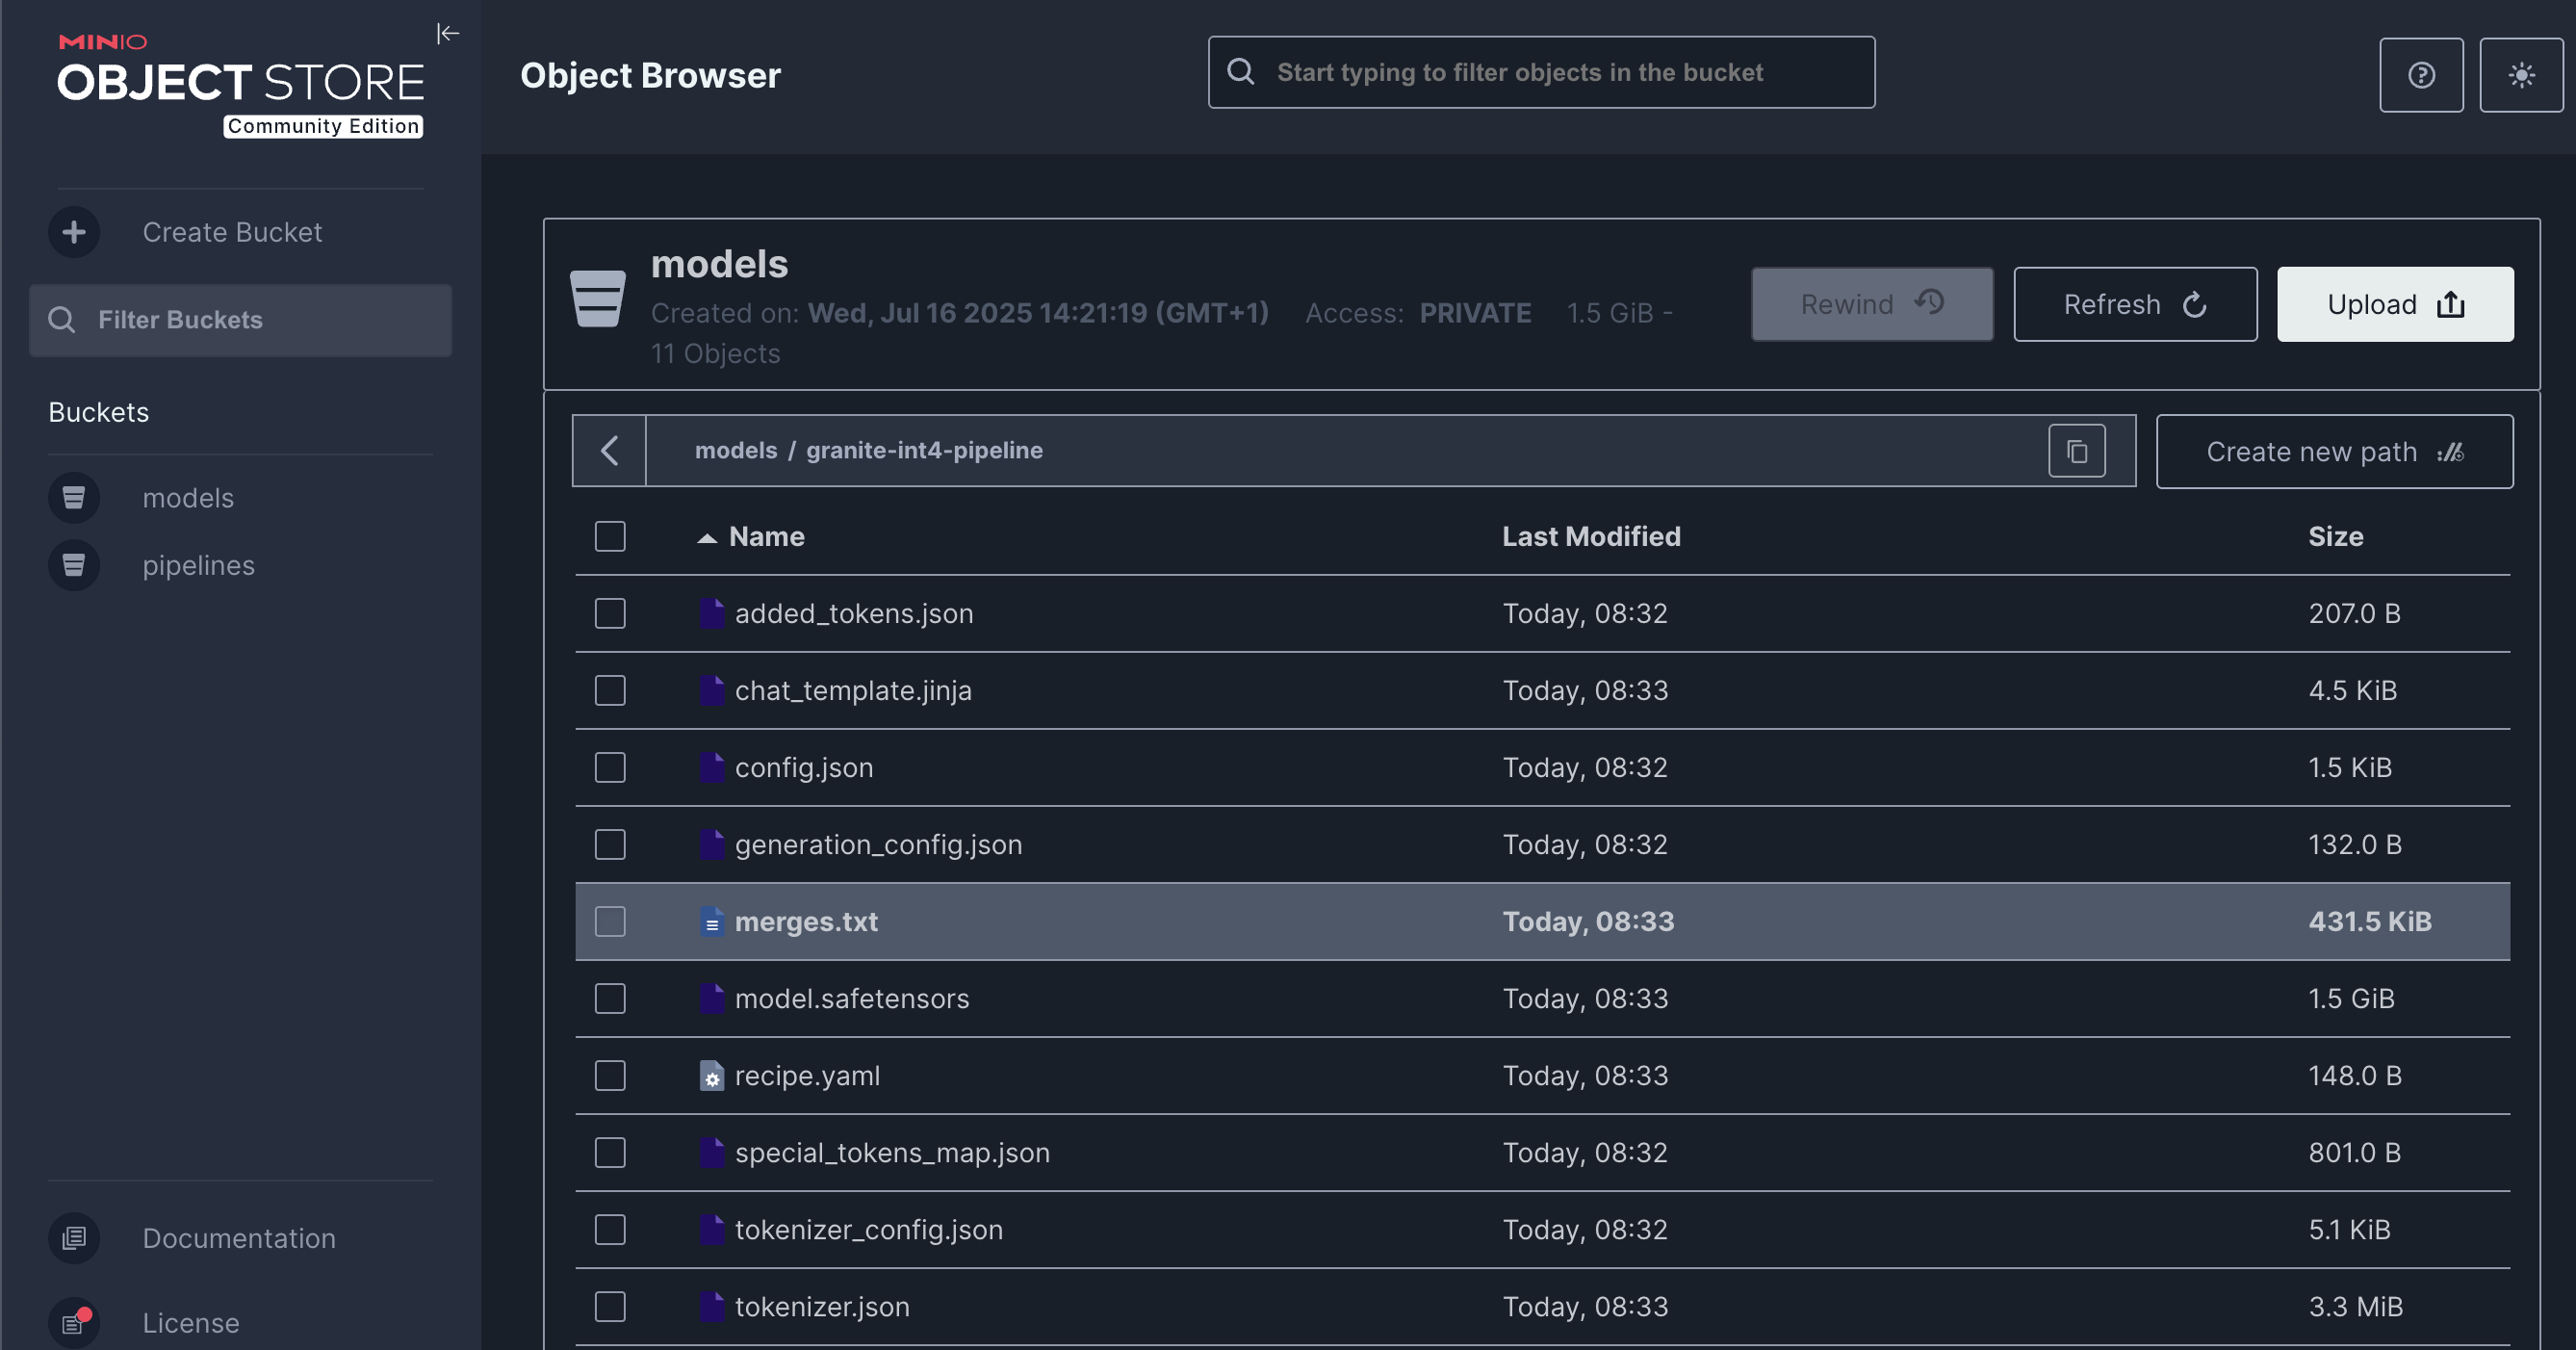 Figure 15. Quantized Model Files in MinIO S3 Bucket
Final Validation Step
Confirm successful model quantization and upload:
-
Quantized model directory appears in S3 bucket with the specified
output_pathname -
Model files include weights, tokenizer, and configuration files
-
Model files size (
*.safetensors) are significantly smaller than the original model (indicating successful quantization) -
Model can be accessed and downloaded from S3 storage
Bonus exercises
-
Make the dataset parameters (such as dataset name, split, and number of calibration samples) configurable in the pipeline instead of hardcoding them.
-
Add support for the
fp8quantization type. For implementation details, refer to the LLM Compressor quantization guide -
Try different quantization schemes and methods to see if you can further improve model accuracy.
-
Integrate MLflow to track and compare the results of your quantization experiments, including accuracy metrics.
-
You may refer to the sample implementation provided at
llm_compressor\lab2-bonus-output
-
Resource Cleanup
After completing the exercise, clean up resources to avoid unnecessary costs:
Automatic Cleanup (by pipeline)
-
PVC deletion: Handled automatically by the pipeline’s DeletePVC component
-
Temporary files: Removed during pipeline execution
Manual Cleanup
-
Pipeline runs: Delete old pipeline runs from OpenShift AI interface
-
Workbench: Ensure workbench is stopped (completed earlier)
-
Check that no orphaned PVCs remain: Navigate to Storage → PersistentVolumeClaims
| The quantized models in S3 storage are your valuable outputs from this exercise. Only delete them if you’re certain they’re no longer needed. |