From Playground to Prototype - Building Your Agent in OpenShift AI
|
Persona: AI Engineer (primary). Also relevant: Data Scientist. |
|
In this lab
You will open an OpenShift AI Workbench, carry over decisions and artifacts from the Llama Stack Playground work in the previous module, then iteratively step through |
|
Estimated time: 60–90 minutes |
Prerequisites
-
Completed environment setup (cluster access, repo fork, tokens)
-
Completed Llama Stack (server available, prompts tested in Playground)
-
Fine-grained GitHub PAT from previous module
|
Have these ready from your Playground session:
|
-
Keep PAT scopes minimal; store tokens securely
-
Do not commit secrets or tokens to notebooks or repo; use pre-commit hooks to check for secrets
-
Prefer Vault-managed secrets where possible
Open an OpenShift AI Workbench
-
In the OpenShift console, switch to your team namespace/project (e.g.,
agent-demo). -
Create a Workbench with a CUDA-enabled image and a GPU or appropriate CPU flavor as provided by your cluster administrator.
-
Start the Workbench server and open JupyterLab.
-
In a terminal inside JupyterLab, clone your fork (or pull latest):
cd ${HOME}
git clone https://github.com/redhat-ai-services/etx-agentic-ai.git
cd etx-agentic-ai|
If you use a persistent volume, your repo may already exist. Ensure it’s up to date before proceeding. |
Load the Agent Notebook
-
In JupyterLab, open
notebooks/agent-prototyping.ipynb. -
We will execute cells top-to-bottom, pausing at each to reflect how it builds on the prior step and prepares the next.
Configure Notebook Environment (matches notebook)
-
Login to OpenShift if you are not already logged in
oc login --server=https://api.${CLUSTER_NAME}.${BASE_DOMAIN}:6443 -u admin -p ${ADMIN_PASSWORD} -
First, expose the Llama Stack service to your Workbench via a port-forward:
# From a Workbench Terminal
oc project llama-stack
oc get svc llamastack-with-config-service
oc -n llama-stack port-forward svc/llamastack-with-config-service 8321:8321 2>&1>/dev/null &This keeps a local tunnel from your Workbench pod to the service on port 8321. Leave it running for the duration of the lab. If your Llama Stack is configured with TLS, you can still use port-forward; adjust the
LLAMA_STACK_URLscheme tohttpsaccordingly.
|
Reset/retry tips:
|
-
Apply required RBAC so the MCP server can read Tekton pipeline pods in
demo-pipeline:oc apply -f infra/tenants/demo-pipeline/base/sno/templates/agent-rolebinding.yaml | cat -
Change directory to the
notebooksfolder:cd notebooks -
Edit the
envif necessary to match your Playground configuration and deployment settings.The notebook loads this file directly with
load_dotenv('env'). Name the file exactlyenv(no dot). If you prefer.env, change the notebook call toload_dotenv('.env'). -
In JupyterLab, open the
agent-prototyping.ipynbnotebook file to begin your work.
Step Through the Notebook Iteratively
Use the following guideposts as you run each section. Run all cells in a section before proceeding to the next.
Section 1: Getting Started with Llama Stack
-
Run (CTRL+ENTER):
! pip install -qr requirements.txtto install dependencies. -
Run: The imports cell.
-
Run:
load_dotenv('env')to loadLLAMA_STACK_URL,LLM_MODEL_ID, etc. -
Run: The server connection cell to create
LlamaStackClient, list models, and printmodel_id. -
Run: The sampling params cell to set
temperature,max_tokens,sampling_params. -
Run: The quick chat completion sanity check.
-
Expected: Model list printed, sampling params displayed, and a reply from the model.
Section 2: Simple Agent with Tool Calling
-
Run: Define
Agentwithtools=['builtin::websearch']andinstructions. -
Run: Define
run_session(…)helper. -
Run: Provide
user_prompts(e.g., latest OpenShift version) and callrun_session(…). -
Expected: Streamed logs from
EventLoggerand a final answer using web search.
Custom client tool (Kubernetes logs):
-
Run: Kubernetes client setup (
load_incluster_config(),CoreV1Api). -
Gather targets and set variables:
-
Option A (Web Console): Switch to the
demo-pipelineproject. Navigate to Pipelines > PipelineRuns. Open the most recent failed run; from its details, click the Pod name for the failed Task to view its Pod. Copy the Pod name and container name. -
Option B (Terminal): Use the
demo-pipelinenamespace and find the most recent failed PipelineRun and its failed Task’s Pod:# list pods in your namespace oc -n <your-namespace> get pods # show container names for a specific pod oc -n <your-namespace> get pod <pod-name> -o jsonpath='{.spec.containers[*].name}{"\n"}' -
Then set in the notebook:
pod_name = "<pod-name>"
namespace = "<your-namespace>"
container_name = "<container-name>"
-
-
Run:
get_pod_log_test(…)to verify access. -
Run: Define
@client_tool get_pod_log(…). -
Run: Agent using
tools=[get_pod_log]and analyze logs withrun_session(…).
If a 403 Forbidden occurs when fetching logs, the PipelineRun may have already completed or permissions aren’t applied. Re-run the pipeline in demo-pipeline (from Pipelines UI or tkn CLI), wait for it to fail, then re-run the notebook cells for log retrieval.
|
-
Expected: Log text returned and summarized by the agent.
Section 3: Prompt Chaining
-
Run: Define agent with
tools=[get_pod_log, 'builtin::websearch']. -
Run: The chained
user_promptsandrun_session(…). -
Expected: Fetches logs → web search → summarized recommendations.
Section 4: ReAct
-
Run: Define
ReActAgentwithtools=[get_pod_log, 'builtin::websearch']andresponse_formatusingReActOutput.model_json_schema(). -
Run: The
user_promptsandrun_session(…). -
Expected: Reason→Act loops with dynamic tool selection.
Section 5: MCP Tools and Full Flow (OpenShift + Web + GitHub)
-
Run: Validate/auto-register MCP tools (e.g.,
mcp::openshift). -
Run: Define full ReAct agent using
tools=["mcp::openshift", "builtin::websearch", "mcp::github"]. -
Edit: In the provided prompt, replace the repo owner with your fork (
"owner":"your-gh-user","repo":"etx-agentic-ai").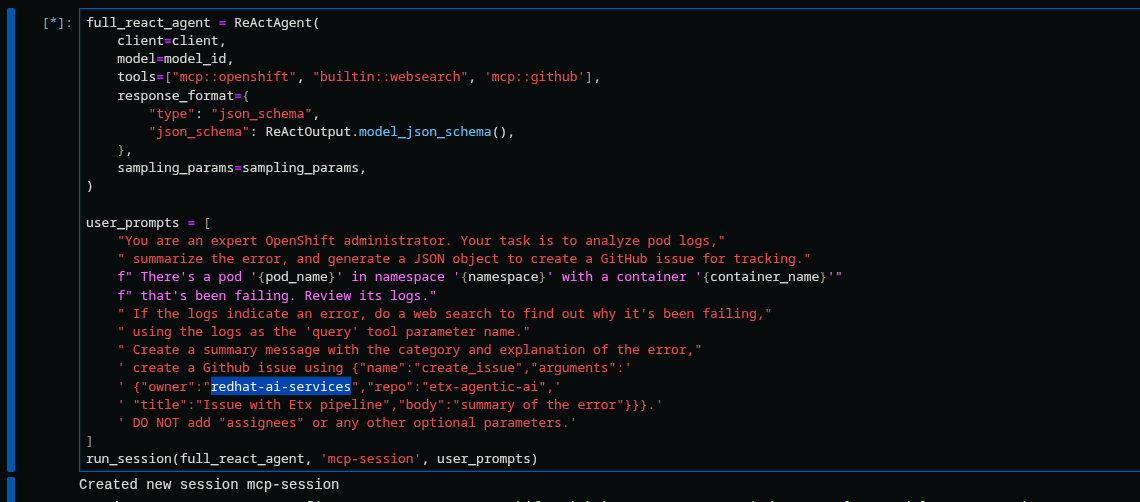
-
Run: Execute
run_session(…)to analyze logs → search → create GitHub issue. -
Expected: Issue is created by the agent; capture the URL from the output.
Optional: Persist Run Artifacts
-
Save a small report with inputs, parameters, and outputs so it can be attached to an issue.
import json, pathlib, time
from os import environ

report = {
    "timestamp": int(time.time()),
    "model": environ.get("LLM_MODEL_ID"),
    "endpoint": environ.get("LLAMA_STACK_URL"),
    "sampling_params": {
        "temperature": environ.get("TEMPERATURE"),
        "max_tokens": environ.get("MAX_TOKENS"),
    },
    "task": "<your final user task>",
    "final_answer": "<paste the agent’s final answer or summary>",
}
pathlib.Path("artifacts").mkdir(exist_ok=True)
with open("artifacts/agent_run_report.json", "w") as f:
    json.dump(report, f, indent=2)
print("Saved artifacts/agent_run_report.json")
Verify the GitHub Issue (created by the agent)
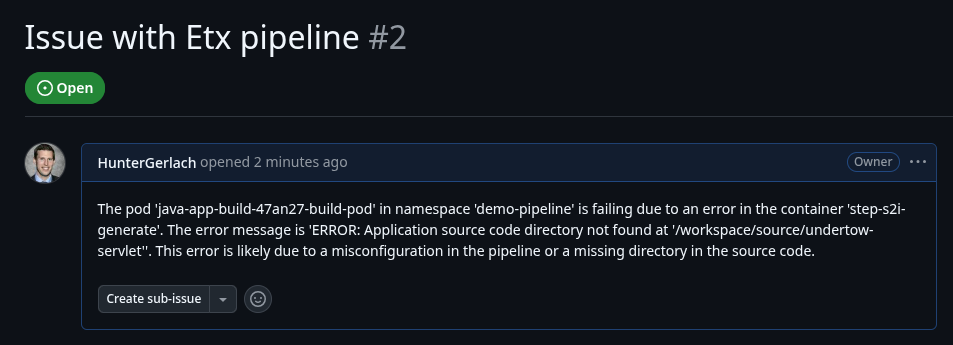
The full MCP-based ReAct run should create the issue automatically via the GitHub MCP server. Capture the URL from the streamed logs or agent output and record it in your lab notes.
|
If something doesn’t work, see Troubleshooting Guide. |
Validation Checklist
-
Workbench server is running; repo is up to date
-
Notebook executed end-to-end with no unresolved errors
-
artifacts/agent_run_report.jsonexists and summarizes the run -
GitHub issue created; URL recorded
Artifacts to carry forward
-
notebooks/envvalues used (LLAMA_STACK_URL, LLM_MODEL_ID, TEMPERATURE, MAX_TOKENS) -
The final agent prompt and tool choices (builtin::websearch, mcp::openshift, mcp::github)
-
artifacts/agent_run_report.json(if created) -
URL of the created GitHub issue
Commit Your Work
git add notebooks/agent-prototyping.ipynb artifacts/agent_run_report.json || true
git commit -m "lab: agent prototype run artifacts"
git push
What’s Next
Great work—your agent prototype is now codified and traceable via a GitHub issue. In the next lesson, we’ll take this into production: Rolling out the Agent.