Lab Setup and Prerequisites
|
Persona: Platform Engineer (primary). Also relevant: AI Engineer. |
|
Estimated time: 60–90 minutes |
What you’ll do
-
Verify cluster access and bootstrap GitOps
-
Initialize Vault and hydrate secrets
-
Fork the repo, set PATs and webhooks
-
Ensure Console Links and core apps are healthy
Prerequisites
Before starting this lab, ensure you have the following:
Required Tools
-
GitHub Account: You’ll need access to fork repositories and collaborate
-
Git CLI: Installed and configured on your local machine
-
OpenShift CLI (oc): Download from OpenShift client downloads
-
HashiCorp Vault CLI: Download from Vault installation guide
-
jq: Command-line JSON processor for parsing command outputs
-
Python 3: Provides
json.toolfor pretty-printing JSON -
envsubst (gettext): For environment variable substitution in manifests
-
Terminal/Command Line: Bash shell with basic utilities (openssl, curl)
-
Ansible Vault: Part of Ansible toolkit for secret management
-
Web Browser: For accessing OpenShift console, MaaS portal, and documentation
Required Skills
-
Basic Git Knowledge: Cloning repositories, basic version control concepts
-
Command Line Basics: Navigating directories, running commands
-
Container Concepts: Understanding of containers and Kubernetes/OpenShift (helpful but not required)
Provided by Instructors
-
OpenShift Cluster Access: GPU-enabled cluster with admin credentials
-
Red Hat MaaS Access: Model-as-a-Service credentials for LLaMA models
-
Workshop Materials: All necessary configuration files and scripts
-
Environment Variables: Cluster-specific configuration values
-
Support: Technical assistance throughout the lab
Getting Started
Before diving into the agentic AI lab, we need to set up our development environment. This involves two key steps:
-
Setting up GitOps: Configure automated deployment pipelines that manage our infrastructure and applications
-
Configuring Secret Management: Set up secure handling of API keys and credentials using HashiCorp Vault
Why this matters: This approach keeps sensitive information (like API keys) separate from our code, following security best practices while enabling automated deployments.
|
For this lab: We have used automated bootstrap scripts to handle the setup quickly so we can focus on building AI agents. |
For later exploration (after the lab):
-
Manual setup: The step-by-step instructions below show how each component works - perfect for understanding GitOps and secret management in detail
Quick Starts
You will do this AFTER you gain access to your cluster. We are explaining it here for awareness before you login so you know how to balance getting started qucikly with the information provided in the lab.
-
We have created some OpenShift Quick Starts to make the initial configuration steps a bit easier to follow. They also allow us to standardize the environment being used (bash, linux command line, tools).
You can browse to the Quick Starts in OpenShift Web Console > Help ? > QuickStarts - then search for etx
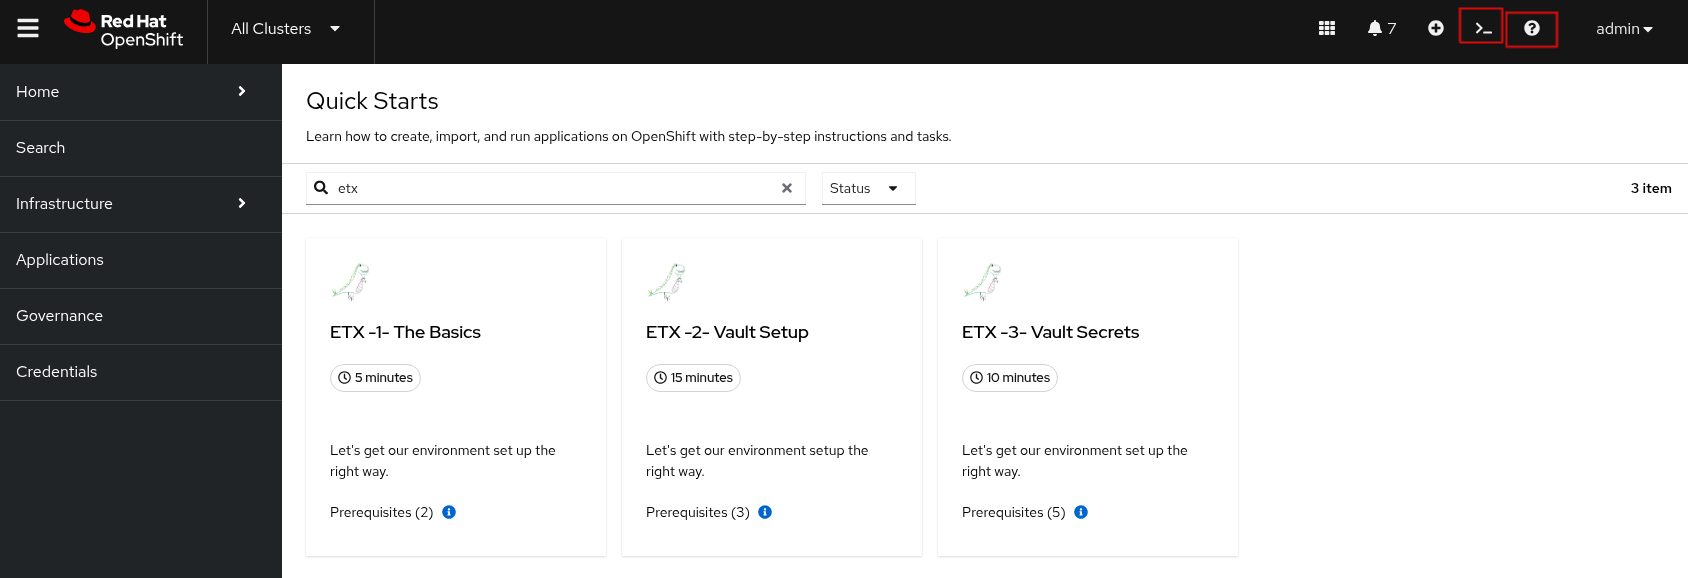 Figure 1. ETX Quick Starts
 -
Select the first one ETX -1- The Basics and then Click Start > Step 1 - Set your shell
-
Next Select Run in Web Terminal play button. The Initialize Terminal screen should appear in the bottom half of your browser.
-
Select Start to run the terminal
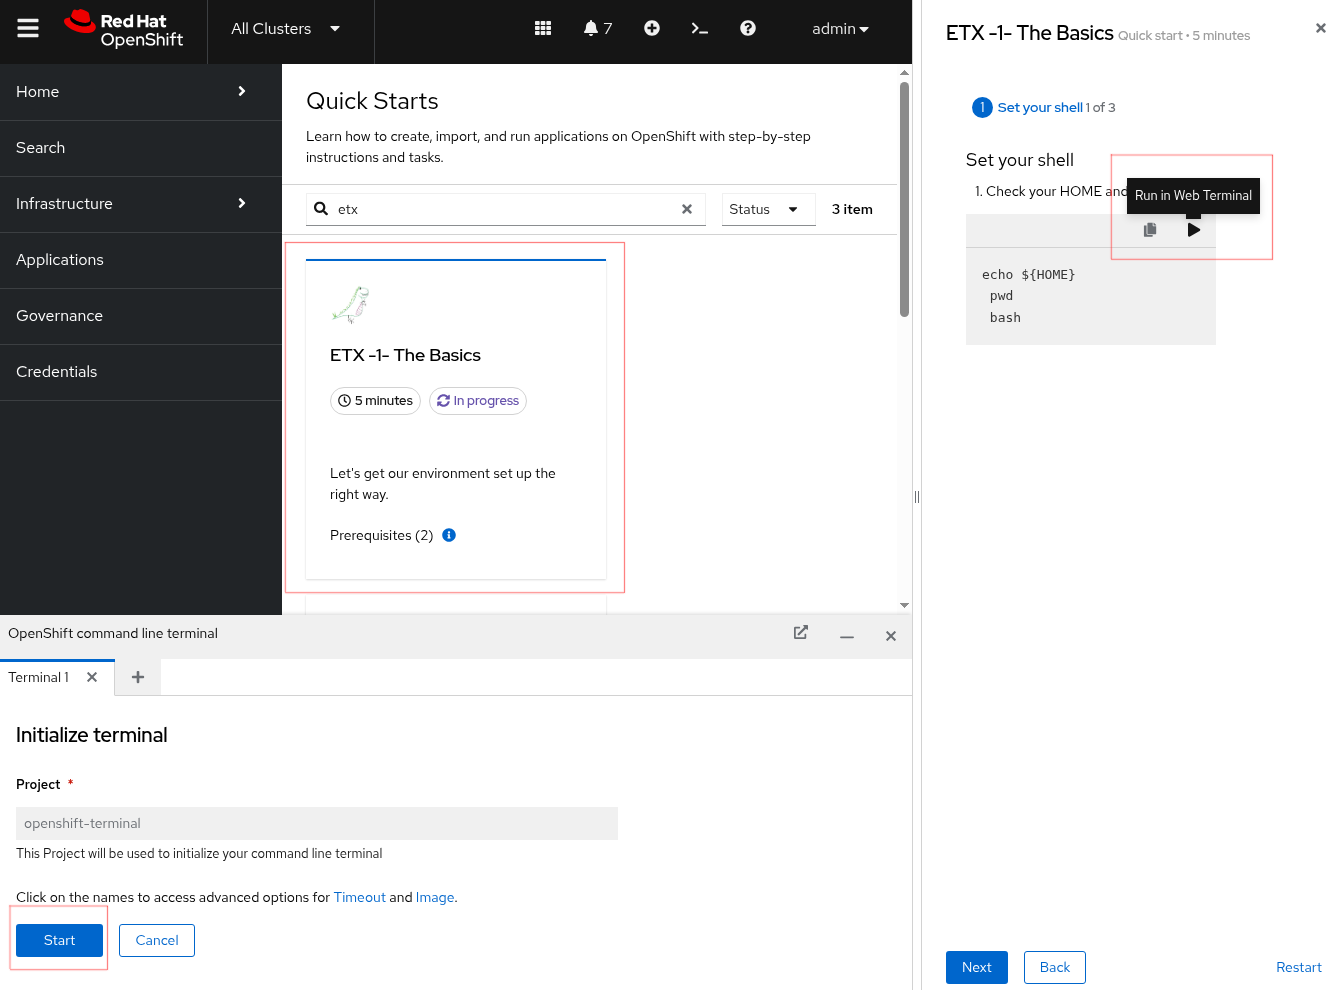 Figure 2. ETX 1 The Basics
 -
Continue with the ETX Quick Starts and follow the documentation at the same time. We will point out in the docs if a step or section is covered in a Quick Start using a TIP
Covered in a Quick Start -
Done ✅
Team Setup
-
You’ll likely either be working in teams of 2 people per cluster or groups of 2 where each person gets their own cluster (if resources are available)
Why teams of two?
-
Resource optimization: GPU-enabled OpenShift clusters are expensive - sharing clusters allows us to provide everyone with powerful hardware
-
Better learning: Pair programming increases knowledge sharing and helps troubleshoot issues faster
-
Real-world practice: Most production AI/ML teams work collaboratively on shared infrastructure and have a mixture of roles and expertise
This setup mirrors how teams work with shared cloud resources in enterprise environments.
-
-
Receive your cluster credentials 🔐
Your instructor will provide OpenShift login credentials for your team’s shared cluster.
-
Set up your shared repository (choose one team member to do this):
-
Fork the etx-agentic-ai repository to your personal GitHub account
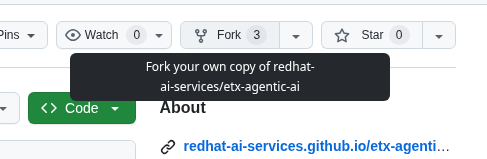 Figure 3. GitHub Repo Fork
 -
Add your teammate as a collaborator with write access
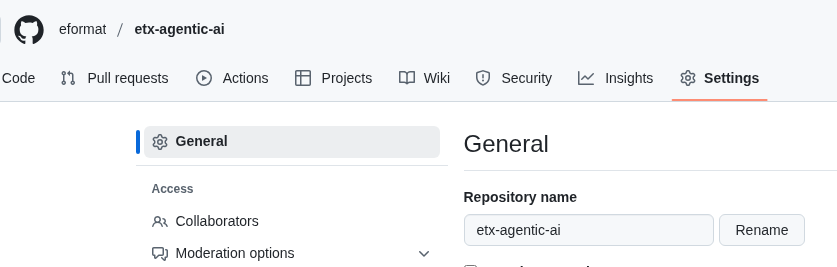 Figure 4. GitHub Repo Collaborators
 -
Ensure that you Enable Issues for your fork under Settings > General > Features > Issues as they are disabled for forked repos by default
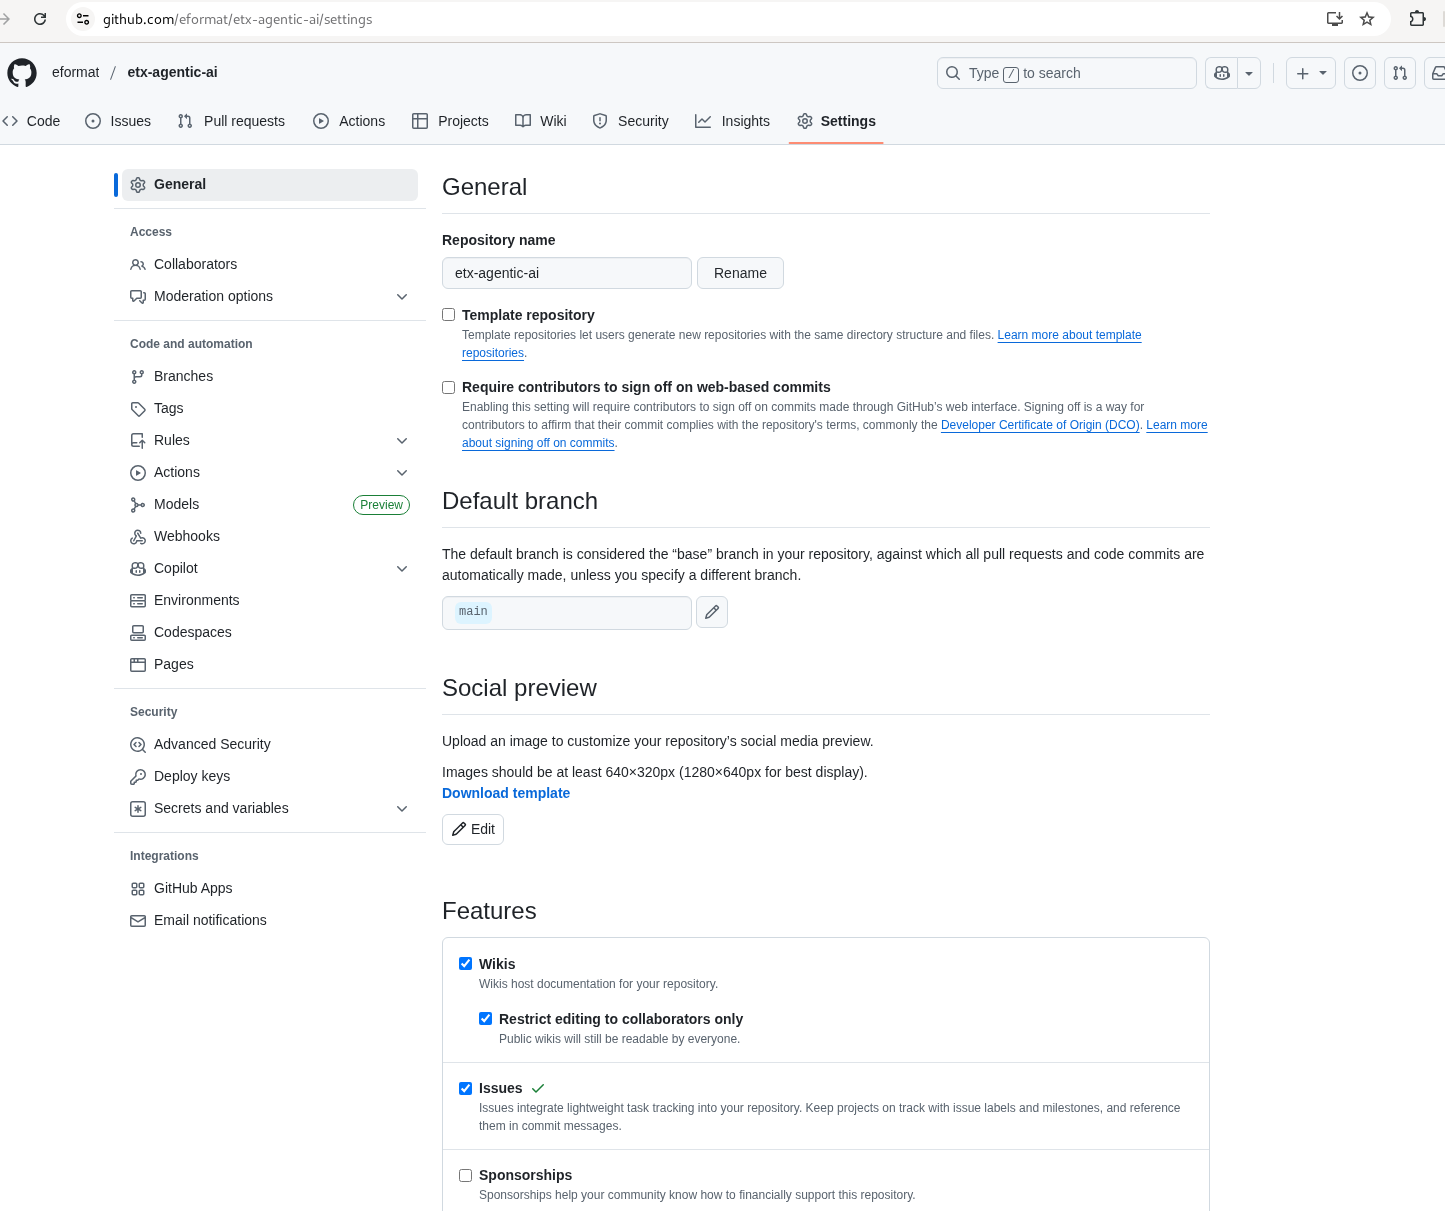 Figure 5. GitHub Repo Enable Issues
-
-
Setup and run the Web Terminal Operator as described in the Quick Starts
-
Both team members: Later in the lab we will clone the forked repository to the OpenShift Web Terminal through steps in the Quick Starts, but if you’re running the lab locally you can go ahead and clone the repository locally to your laptop.
git clone git@github.com:your-gh-user/etx-agentic-ai.git cd etx-agentic-ai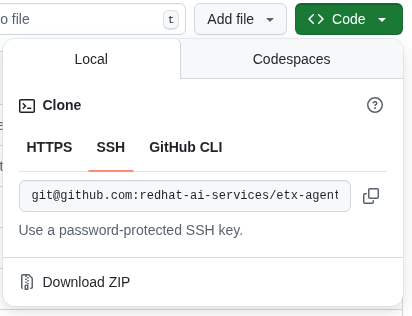 Figure 6. GitHub Repo Clone
Replace
your-gh-userwith the actual GitHub username of whoever forked the repository. -
Verify your setup ✅
You should now have:
-
Access to your team’s OpenShift cluster
-
A shared fork of the repository with both teammates as collaborators
-
Local copies of the code on both laptops
-
Cluster Environment
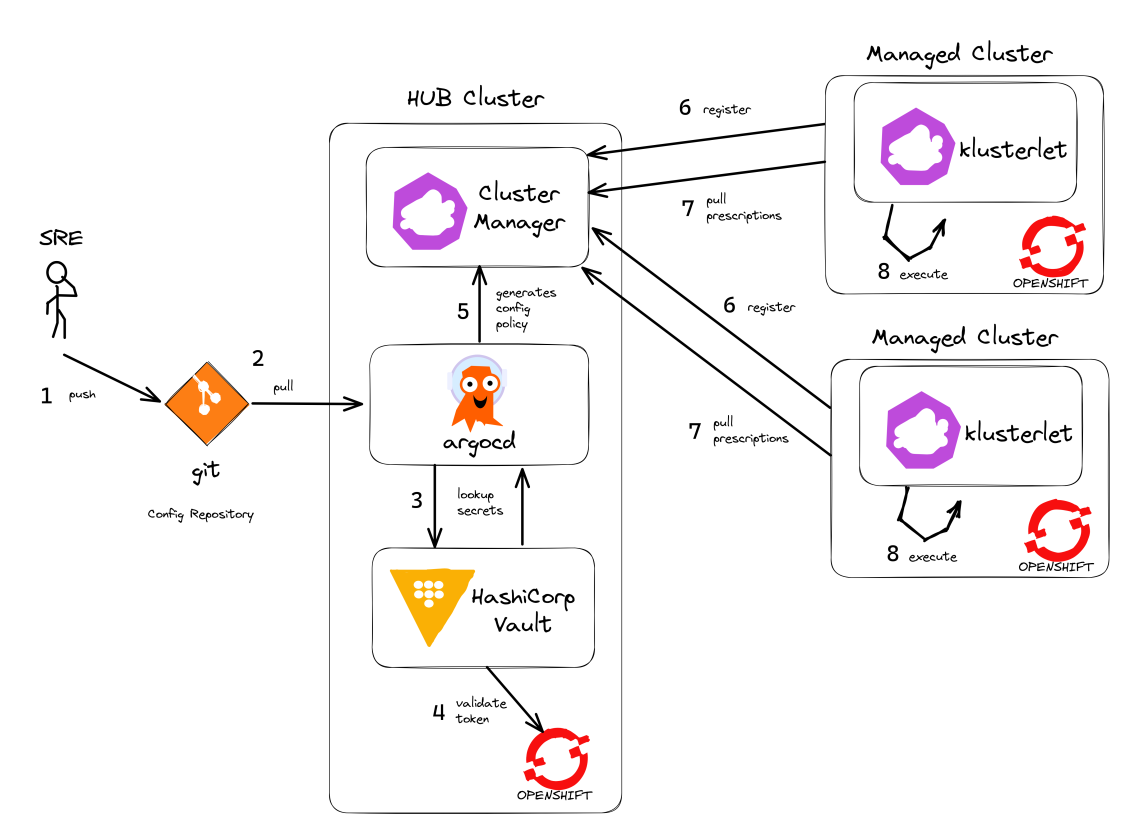
Your team has access to a fully-featured OpenShift cluster designed for AI workloads. This cluster mimics many customer production environments. Here’s how the platform is architected:
Bootstrap Components
These foundational components are deployed first to establish the platform’s operational baseline:
-
Red Hat OpenShift: Enterprise Kubernetes platform providing container orchestration
-
Advanced Cluster Management (ACM): Multi-cluster governance and GitOps orchestration
-
Argo CD: Declarative, Git-driven application deployments
-
HashiCorp Vault: Secure credential storage and automated secret injection
Security, Governance, and Delivery (Argo CD + Policy as Code)
Built on the bootstrap foundation, we combine continuous delivery with continuous compliance:
|
Why both exist in this repo
What policies can assert here:
This pairing yields:
Learn more: |
Developer Platform Services
Self-service capabilities that enable development teams:
-
CI/CD Pipelines: Tekton for automated container builds, testing, and deployments
-
Source Control Integration: Git-based workflows with automated quality gates
-
Container Registry: Secure image storage with vulnerability scanning and promotion workflows
Tenant & Workload Services
Multi-tenant capabilities providing isolated, secure environments:
-
Namespace Management: Multi-tenant isolation with RBAC and resource quotas
-
Development Workbenches: Self-service Jupyter environments for data science teams
-
Service Mesh: Secure service-to-service communication and traffic management
AI/ML Platform Services
Specialized services for AI/ML workloads and agentic applications:
-
Red Hat OpenShift AI (RHOAI): Managed AI/ML platform with GPU acceleration
-
Model Serving Infrastructure: Scalable inference endpoints with model lifecycle management
-
Agentic AI Runtime: Environment for deploying AI agents with external service integrations
|
LLaMA Stack Integration: Our agentic AI workloads leverage LLaMA Stack, a composable framework that provides standardized APIs for model inference, safety guardrails, and tool integration. This allows our AI agents to seamlessly interact with large language models while maintaining consistent interfaces for memory management, tool calling, and safety controls across different model providers. |
The Benefits:
-
ZERO configuration drift - what’s in git is real
-
Integrates into the Governance Dashboard in ACM for SRE
-
We start as we mean to go on - we are Green from GO so that our dev environment looks like prod only smaller
-
All our clusters and environments are Kubernetes Native once bootstrapped
Required Applications
As a Team, you need to do each of these Prerequisites.
-
We Recommend using the Quick Starts initially, then your laptop after the initial setup.
Start with the Quick Start - ETX 1 The Basics
-
You may choose another client to bootstrap from (not recommended especially if you are on MacOSX which is not fully tested). It could be:
-
Your Laptop or a Toolbx or a Fedora like jumphost or a Workbench Terminal that can access your cluster and the internet
-
Your bootstrap client must have a bash shell with openssl, ansible-vault installed
-
Download and Install the Hashi Vault Client binary
-
Login to your OpenShift cluster using the OpenShift client as the cluster-admin user
-
-
Setup env vars and login to OpenShift. You can either use the OpenShift Web Console to grab a login command or use the details below to construct the login command on your own.
Covered in a Quick Start export ADMIN_PASSWORD=password # replace with yours export CLUSTER_NAME=ocp.4ldrd # replace with yours export BASE_DOMAIN=sandbox2518.opentlc.com # replace with yoursoc login --server=https://api.${CLUSTER_NAME}.${BASE_DOMAIN}:6443 -u admin -p ${ADMIN_PASSWORD} -
Done ✅
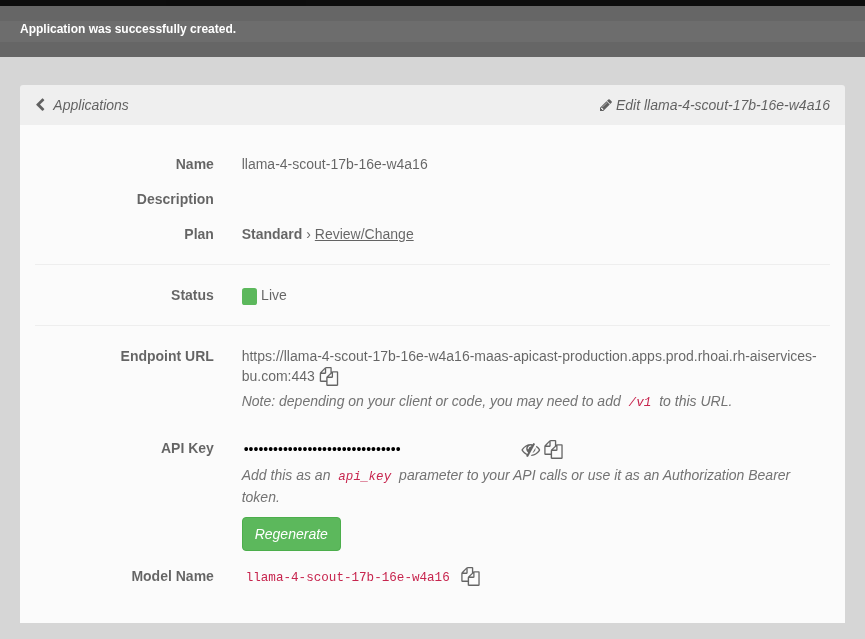
MaaS credentials (Optional)
|
This whole section can be skipped unless you wish to use your own Model as a Service Credentials. We will share the provided credentials to save time. Gather your Model as a Service Credentials.
|
Vault Setup for GitOps
| Covered in a Quick Start |
We need to setup vault for your environment.
-
Initialize the vault. Make sure you record the UNSEAL_KEY and ROOT_TOKEN somewhere safe and export them as env vars.
oc -n vault exec -ti vault-0 -- vault operator init -key-threshold=1 -key-shares=1 -tls-skip-verifyexport UNSEAL_KEY=EGbx... export ROOT_TOKEN=hvs.wnz...After running the vault initialization command, you’ll see output containing the unseal key and root token. Copy these values and export them as environment variables as shown.

-
Unseal the Vault.
oc -n vault exec -ti vault-0 -- vault operator unseal -tls-skip-verify $UNSEAL_KEY(Optional Reading) You can see more details of this sort of setup here if you need more background. -
Setup env vars
export VAULT_ROUTE=vault-vault.apps.${CLUSTER_NAME}.${BASE_DOMAIN} export VAULT_ADDR=https://${VAULT_ROUTE} export VAULT_SKIP_VERIFY=true -
Login to Vault.
vault login token=${ROOT_TOKEN} -
You should see the following output:
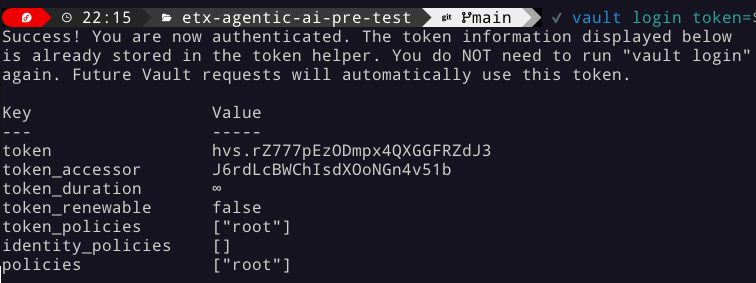 Figure 9. Vault Login
 -
Setup env vars
export APP_NAME=vault export PROJECT_NAME=openshift-policy export CLUSTER_DOMAIN=apps.${CLUSTER_NAME}.${BASE_DOMAIN} -
Create the Vault Auth using Kubernetes auth
vault auth enable -path=${CLUSTER_DOMAIN}-${PROJECT_NAME} kubernetes export MOUNT_ACCESSOR=$(vault auth list -format=json | jq -r ".\"$CLUSTER_DOMAIN-$PROJECT_NAME/\".accessor") -
Create an ACL Policy - Argo CD will only be allowed to READ secret values for hydration into the cluster
vault policy write $CLUSTER_DOMAIN-$PROJECT_NAME-kv-read -<< EOF path "kv/data/*" { capabilities=["read","list"] } EOF -
Enable kv2 to store our secrets
vault secrets enable -path=kv/ -version=2 kv -
Bind the ACL to Auth policy
vault write auth/$CLUSTER_DOMAIN-$PROJECT_NAME/role/$APP_NAME \ bound_service_account_names=$APP_NAME \ bound_service_account_namespaces=$PROJECT_NAME \ policies=$CLUSTER_DOMAIN-$PROJECT_NAME-kv-read \ period=120s -
Grab the cluster CA certificate on the API
CA_CRT=$(echo "Q" | openssl s_client -showcerts -connect api.${CLUSTER_NAME}.${BASE_DOMAIN}:6443 2>&1 | awk '/BEGIN CERTIFICATE/,/END CERTIFICATE/ {print $0}') -
Add the initial token and CA cert to the Vault Auth Config.
vault write auth/${CLUSTER_DOMAIN}-${PROJECT_NAME}/config \ kubernetes_host="$(oc whoami --show-server)" \ kubernetes_ca_cert="$CA_CRT" -
Done ✅
Tavily search token
Gather your Tavily web search API Key.
-
Setup a Tavily api key for web search. Login using a github account of one of your team members.
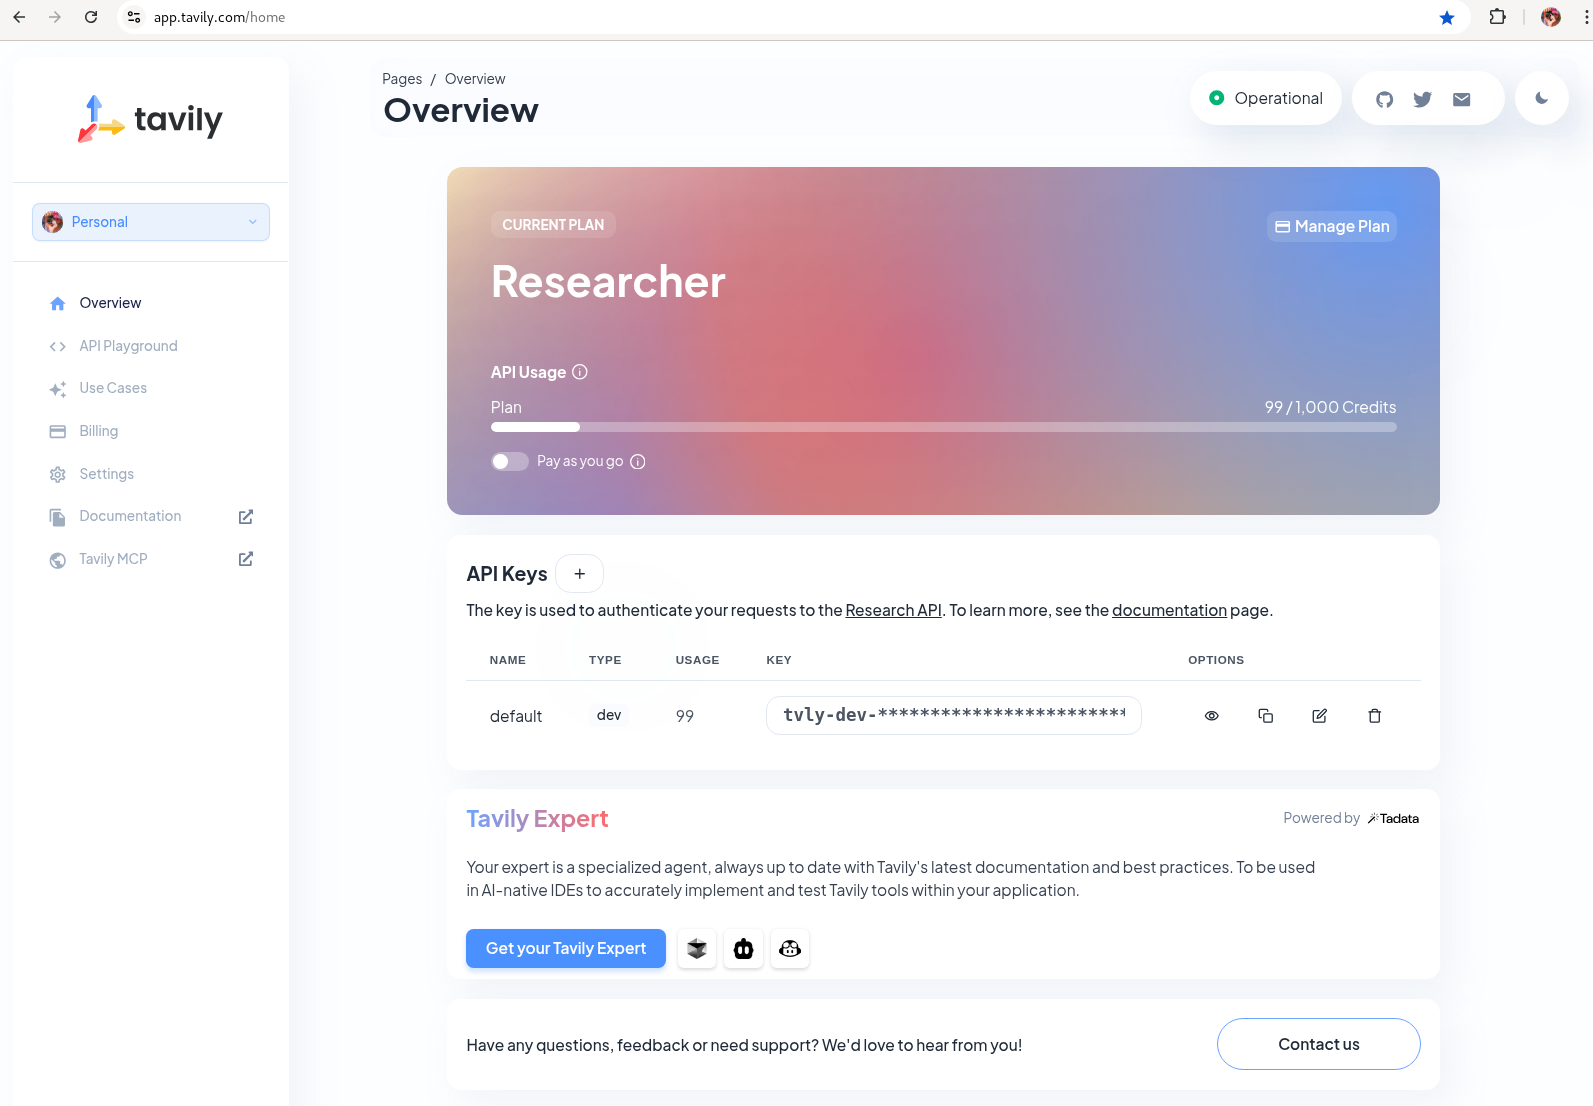 Figure 10. Tavily API Key
 -
Done ✅
GitHub Token
Create a fine-grained GitHub Personal Access (PAT) Token.
-
Login to GitHub in a browser, then click on your user icon > Settings
-
Select Developer Settings > Personal Access Tokens > Fine-grained personal access tokens
-
Select Button Generate a new token - give it a token name e.g. etx-ai
-
Set Repository access
All repositories: allow access to your repositories including read-only public repos.
-
Give it the following permissions:
Commit statuses: Read-Only
Content: Read-Only
Issues: Read and Write
Metadata: Read-Only (this gets added automatically)
Pull requests: Read-Only
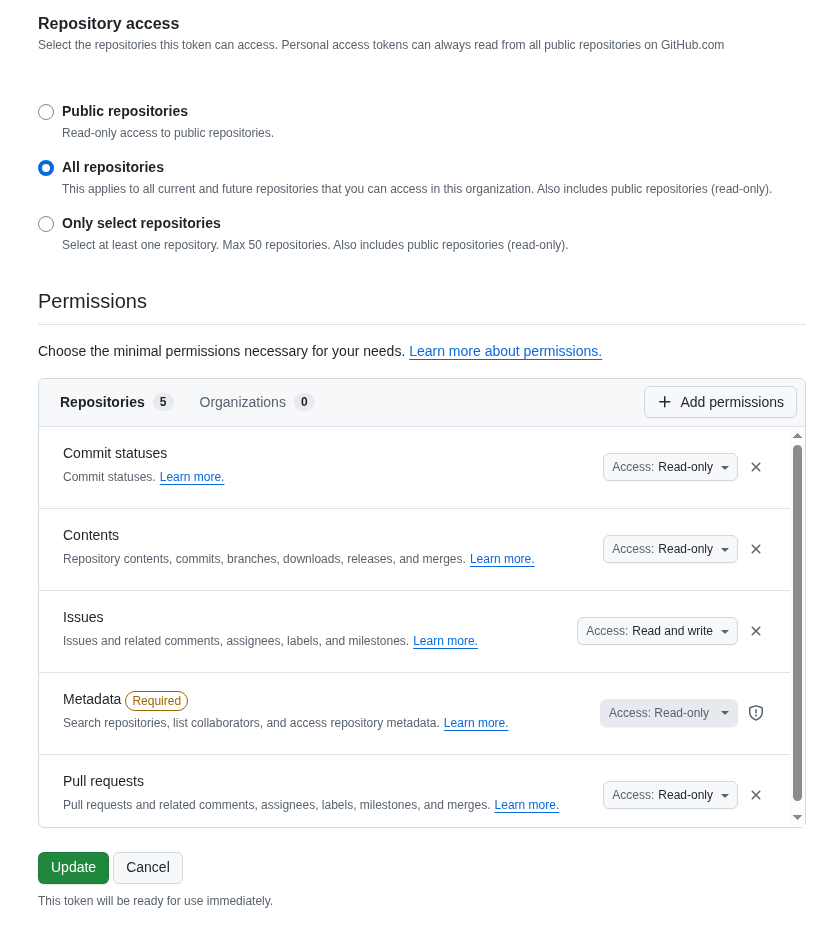 Figure 11. GitHub Repo Perms
 -
Generate the token.
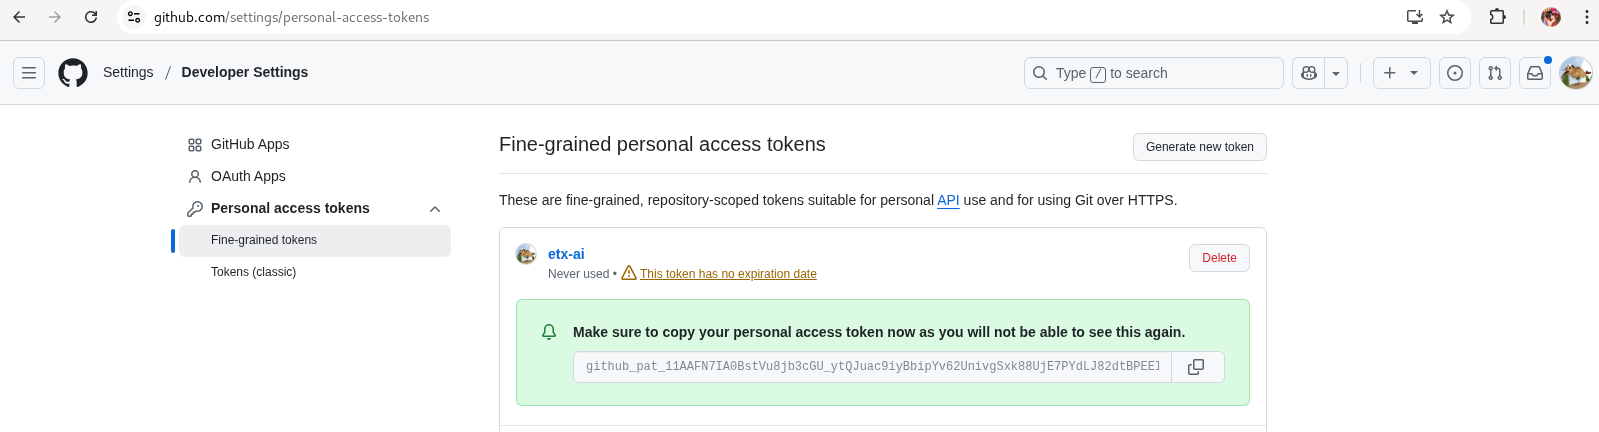 Figure 12. GitHub Repo Token
 -
Done ✅
GitHub Webhook
Create a webhook that fires from your GitHub repo fork to Argo CD on the OpenShift Cluster. This ensures the applications are synced whenever you push a change into git (rather than wait the 3min default sync time).
-
Login to GitHub in a browser, go to your etx-agentic-ai fork > Settings
-
Select Webhooks
-
Select Add Webhook. Add the following details
Payload URL: https://global-policy-server-openshift-policy.${CLUSTER_DOMAIN}/api/webhook - You can get the correct URL by echoing this out on the command line:
echo https://global-policy-server-openshift-policy.${CLUSTER_DOMAIN}/api/webhookContent Type: application/json
SSL Verification: Enable SSL Verification
Which events: Send me everything
-
Click Add Webhook
 Figure 13. GitHub Webhook
 -
Done ✅
The Secrets File
| Covered in a Quick Start |
|
Why Do This
We need to be able to hydrate the vault from a single source of truth. It makes secret management very efficient. In the case if a disaster, we need to recover the vault environment quickly. We can check this file into git as an AES256 encoded file (until quantum cracks it ❈). |
The secrets file is just a bash shell script that uses the vault cli.
-
Unencrypt the secrets file
the instructor will provide the key ansible-vault decrypt infra/secrets/vault-sno -
Review the file and set the gathered api tokens as env vars in the secrets file. Add your Tavily and GitHub Pat tokens to the file.
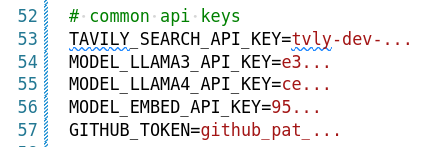 Figure 14. Add API Tokens
You can create a secrets file from scratch by copying the example file provided. Only do this if you are using your own MaaS API keys or do not have access to the decrypt key.
cp infra/secrets/vault-sno-example infra/secrets/vault-sno -
Hydrate the vault by running the secrets file as a script. When prompted to enter the root token, use the $ROOT_TOKEN you exported earlier.
sh infra/secrets/vault-sno -
Encrypt the secrets file and check it back into your git fork. Generate a large secret key to use to encrypt the file and keep it safe.
you can put the key in vault 🔑 openssl rand -hex 32 -
Ansible vault encrypt will prompt you for the Key twice
ansible-vault encrypt infra/secrets/vault-sno -
Add to git
# Its not real unless its in git
git add infra/secrets/vault-sno; git commit -m "hydrated vault with apikeys"; git push
Optional (but highly recommended)You can add a pre-commit git hook client side so that you do not check in an unencrypted AES256 secrets file. Run this after cloning forked repo to configure git hooks:
chmod 755 infra/bootstrap/pre-commit cd .git/hooks ln -s ../../infra/bootstrap/pre-commit pre-commit cd ../../ -
Lastly, create the secret used by Argo CD to connect to Vault in our OpenShift cluster. Since the OpenShift TokenAPI is used, we only really reference the service account details.
cat <<EOF | oc apply -f- kind: Secret apiVersion: v1 metadata: name: team-avp-credentials namespace: openshift-policy stringData: AVP_AUTH_TYPE: "k8s" AVP_K8S_MOUNT_PATH: "auth/${CLUSTER_DOMAIN}-${PROJECT_NAME}" AVP_K8S_ROLE: "vault" AVP_TYPE: "vault" VAULT_ADDR: "https://vault.vault.svc:8200" VAULT_SKIP_VERIFY: "true" type: Opaque EOF -
Your Agentic Argo CD is now setup to read secrets from Vault and should be in a healthy state.

-
You can also login to Vault using the Vault UI and $ROOT_TOKEN from the OpenShift web console to check out the configuration if it is unfamiliar.
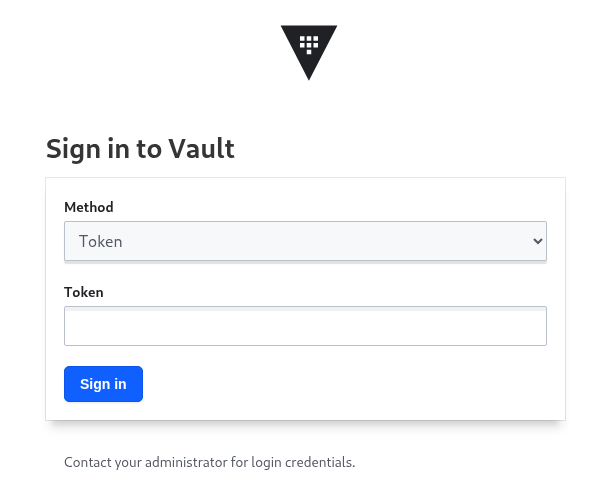 Figure 15. Login to Vault
 -
Done ✅
💥 Expert Mode 💥
|
Experts Only ⛷️
Only run this script if you are familiar with the Hashi Vault setup we just ran through and you skipped all the previous vault steps to get to here. Run the all-in-one vault setup script. Done ✅ |
Complete the Bootstrap
-
The following OpenShift ConsoleLinks should already exist in your cluster:
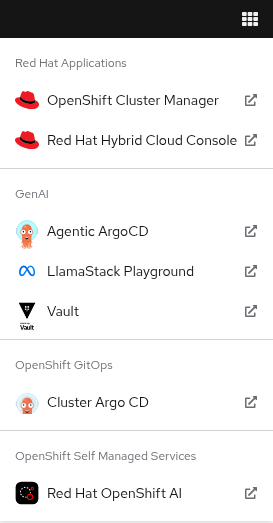
Red Hat Applications - these are cloud services provided by Red Hat for your cluster.
GenAI - these are the GenAI applications that we will be using in the exercises. The Agentic Argo CD should be running but is empty (no apps deployed yet) and is our GitOps application. The LLamaStack Playground is not deployed yet, but will be the link for the LlamaStack UI for integrating Tools and Agents. Vault is running and initialized and unsealed and is the app that stores our secrets.
OpenShift GitOps - this is the cluster bootstrap Argo CD GitOps. This has all of the setup to get started for our cluster. It does not include the Agentic applications that we cover in the exercises.
RHOAI - the UI for Red Hat OpenShift AI. Login here to access your Data Science workbenches, models, pipelines and experiments.
-
Bootstrap App-of-Apps
# We need to update our Argo CD Apps to point to your team fork export YOUR_GITHUB_USER=your-gh-user # the Team member who forked the GitHub Repo cd etx-agentic-ai # Navigate to root directory of code base if not already there -
Replace the
redhat-ai-servicesthroughout the file with your GitHub username.sed -i "s/redhat-ai-services/${YOUR_GITHUB_USER}/g" infra/app-of-apps/etx-app-of-apps.yaml -
Update the
redhat-ai-servicesto your GitHub username in theetx-app-of-apps.yamlfile.for x in $(ls infra/app-of-apps/sno); do sed -i "s/redhat-ai-services/${YOUR_GITHUB_USER}/g" infra/app-of-apps/sno/$x done -
Now we can save, commit, and push the changes to your GitHub fork.
# Its not real unless its in git git add .; git commit -m "using my github fork"; git push -
Finally, we can bootstrap the apps into our cluster.
# Bootstrap all our apps
oc apply -f infra/app-of-apps/etx-app-of-apps.yaml
This will install the tenant pipeline app and observability stack into our cluster. All the other GenAI apps are undeployed for now. You can check this in your app-of-apps/cluster-name github fork folder.

-
Check the Install progress of the app-of-apps in the Agentic Argo CD
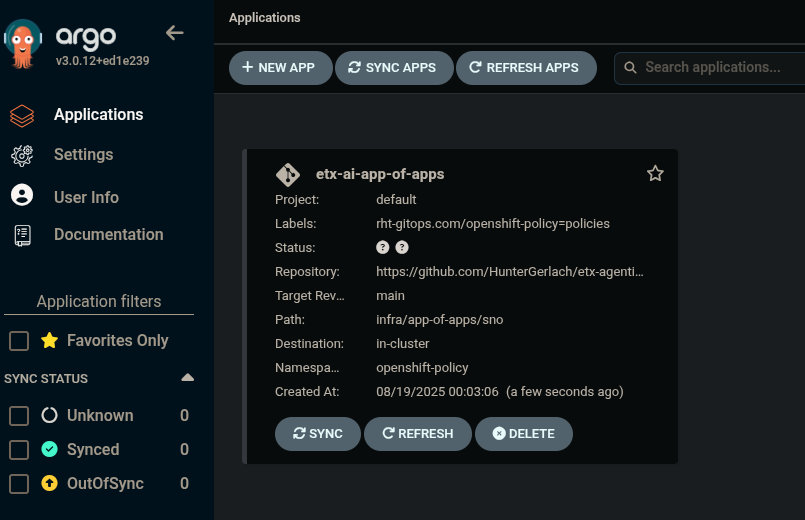
-
You will need to wait for the individual apps to be installed. This may take a few minutes. After a few minutes, you should see the following output to show that the apps have been installed.
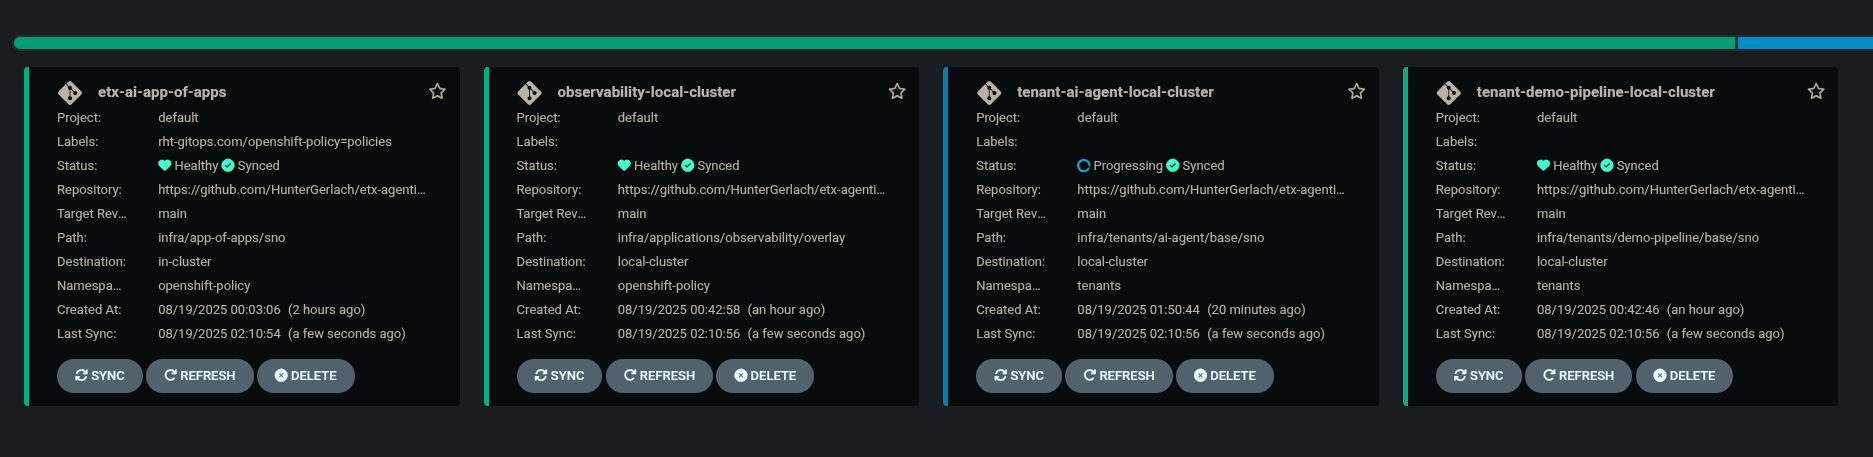
Also, notice that the
tenant-ai-agent-local-clusterapp is constantly in a progressing state. This is something we will address later in this course. -
Done ✅
Our Data Science Team Have A Request
It seems there is only limited GPUs in the cluster. In this example 1 GPU. We already have an LLM Model deployed at bootstrap time using this GPU.
The Data Science team 🤓 have requested to use GPUs for their Data Science Workbenches e.g. when they use a Pytorch, CUDA or other stack image that can directly access an accelerator.
Given the cluster already has access to one GPU node let’s quickly set up this access for them. Note that your cluster may be configured with more GPU nodes.
In our case we have a single NVIDIA accelerator attached to our instance type.
-
Check what EC2 GPU enabled instance types we have running in our cluster
oc get machines.machine.openshift.io -ANAMESPACE NAME PHASE TYPE REGION ZONE AGE openshift-machine-api ocp-kt5tz-master-0 Running c6a.2xlarge us-east-2 us-east-2a 24h openshift-machine-api ocp-kt5tz-master-1 Running c6a.2xlarge us-east-2 us-east-2b 24h openshift-machine-api ocp-kt5tz-master-2 Running c6a.2xlarge us-east-2 us-east-2c 24h openshift-machine-api ocp-kt5tz-worker-gpu-us-east-2a-9vxzv Running g6e.2xlarge us-east-2 us-east-2a 24h openshift-machine-api ocp-kt5tz-worker-us-east-2a-fcbcg Running m6a.4xlarge us-east-2 us-east-2a 24h openshift-machine-api ocp-kt5tz-worker-us-east-2b-5zx84 Running m6a.4xlarge us-east-2 us-east-2b 24h openshift-machine-api ocp-kt5tz-worker-us-east-2c-z9xzs Running m6a.4xlarge us-east-2 us-east-2c 24h -
In our example, we have a g6e.2xlarge instance type, but your cluster may have a different instance type or GPU configuration. Take a moment to check with your classmates or instructor what instance types are present in your environment.
To see how many GPUs are allocatable on your node, run:
oc get $(oc get node -o name -l beta.kubernetes.io/instance-type=g6e.2xlarge) -o=jsonpath={.status.allocatable} | python3 -m json.tool(If your instance type is different, adjust the
g6e.2xlargelabel accordingly.)For our cluster, the output shows 1 allocatable GPU:
{ "cpu": "7500m", "ephemeral-storage": "114345831029", "hugepages-1Gi": "0", "hugepages-2Mi": "0", "memory": "63801456Ki", "nvidia.com/gpu": "1", "pods": "250" } -
Label the node with the device-plugin.config that matches the GPU instance product e.g. NVIDIA-L40S for this instance type.
oc label --overwrite node \
    --selector=nvidia.com/gpu.product=NVIDIA-L40S \
    nvidia.com/device-plugin.config=NVIDIA-L40S
If your instance type has different accelerators, you will need to adjust the label used here and the ConfigMap in the next step. -
Now apply the GPU Cluster Policy and ConfigMap objects that setup Time Slicing - a method to share nvidia gpus.
oc apply -k infra/applications/gpu -
After approx ~30sec check the number of allocatable GPUs
oc get $(oc get node -o name -l beta.kubernetes.io/instance-type=g6e.2xlarge) -o=jsonpath={.status.allocatable} | python3 -m json.toolThis should now give an output with 8 allocatable GPUs. Great - now our data science team can see and use eight GPUs even though we only have one physical GPU.
{ "cpu": "7500m", "ephemeral-storage": "114345831029", "hugepages-1Gi": "0", "hugepages-2Mi": "0", "memory": "63801456Ki", "nvidia.com/gpu": "8", "pods": "250" } -
Done ✅
Technical Knowledge
-
Good understanding of OpenShift/Kubernetes concepts
-
Basic familiarity with Python programming
-
Good knowledge of containerization concepts
-
Basic understanding of CI/CD pipelines
-
Good grasp of GitOps and Everything as Code practices
☕ Buckle Up, Here we go …